| The Public Paperfolding History Project
Last updated 20/8/2025 x |
|||||||
| Exercises Methodiques de Travaux Manuels au Moyen de Pliage de Papier by Jean Boogaerts, 1890 | |||||||
| 'Exercises
Methodiques de Travaux Manuels au Moyen de Pliage de
Papier sans Outils ni Instruments Adaptes a
L'Enseignements dans les Ecoles Primaires' (Methodical
Exercises for Manual Work by means of Paper Folding
without Tools or Instruments Suitable for Teaching in
Primary Schools) by Jean Boogaerts was published in
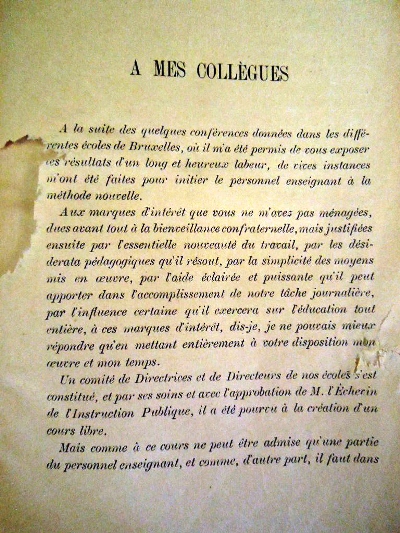
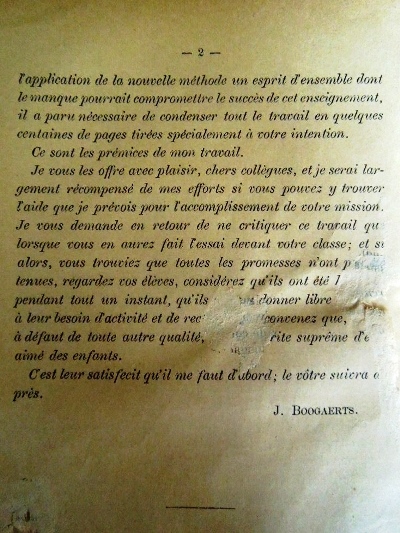
Belgium and France in 1890. 'La Methode Boogaerts', which it explains, uses a mixture of folding and cutting to create basic patterns or forms which are then combined into larger patterns or structures. The work contains many designs that are not previously known, and it seems reasonable to assume that these may be the original creations of the author. It seems to me that this is supported by the wording of the introduction, 'A Mes Collegues', below, although it is not specifically stated. I have not seen a full copy of the work. The pages I have seen were scanned from the copy of the work held in the Biblioteca Nacional del Maestros in Buenos Aires and kindly supplied to me by Juan Gimeno. Many of the Figures and most of the explanatory text are missing. Some of the same material appears, without acknowledgement of the source, in 'Construction Work in Cardboard and Paper' by Robert M Smith, which was published in 1900, and, where possible, I have used that later work to aid me in interpreting this one. The first chapter, Plier, Ployer, Dechirer', explains the technique that the author uses to avoid the use of scissors. 'Plier' is folding and creasing on a surface, without sharpening / reinforcing the crease between the nails, which is 'Ployer', and 'Dechirer' is tearing along the crease thus sharpened / reinforced. **********
**********
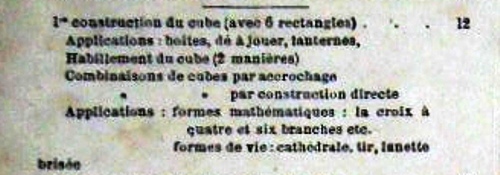
********** Analysis This Analysis lists those designs from the work that can easily be identified and understood. There is a more detailed Analysis in the section headed 'The Work' below, where I have attempted to marry up the entries in the Index of the work with those of the Figures available to me. Further analysis is ongoing but will necessarily remain incomplete until the missing pages become available. ********** 1er construction de cube (avec 6 rectangles - cartes a jouer) - The Playing Card Cube
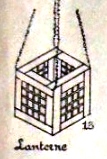
As well as the basic construction, the illustrations also show: How to cut the centres from the modules to create an outline cube, and turn this into a lantern
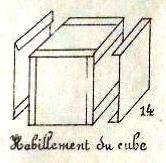
*** How to clad the cube with six other cards
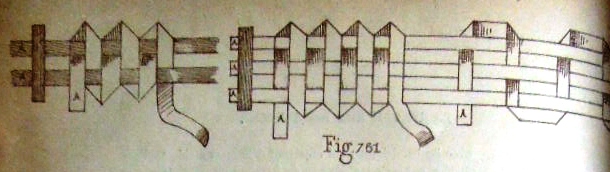
*** How to link the cubes together by interweaving the flaps and how to make ...
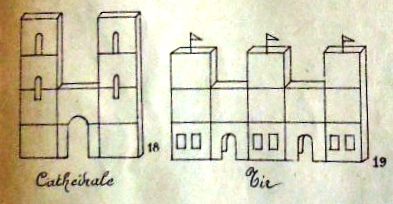
*** towers and buildings
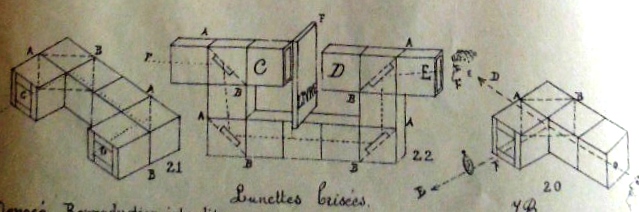
*** a curious design called 'broken glasses' which uses mirrors inside the cubes
*** complex geometrical forms . *** Clad cubes can also be joined together using strips
********** Le Carre Double - The Playing Card Square
*** These simple two-part modular designs can be combined in various ways, either by simply being slipped inside each other
*** or by being threaded onto paper strips, in one or both directions, to create many two
*** and three-dimensional forms.
*** This section also shows how to make a rectangular version (illustration from Smith)
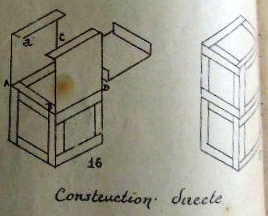
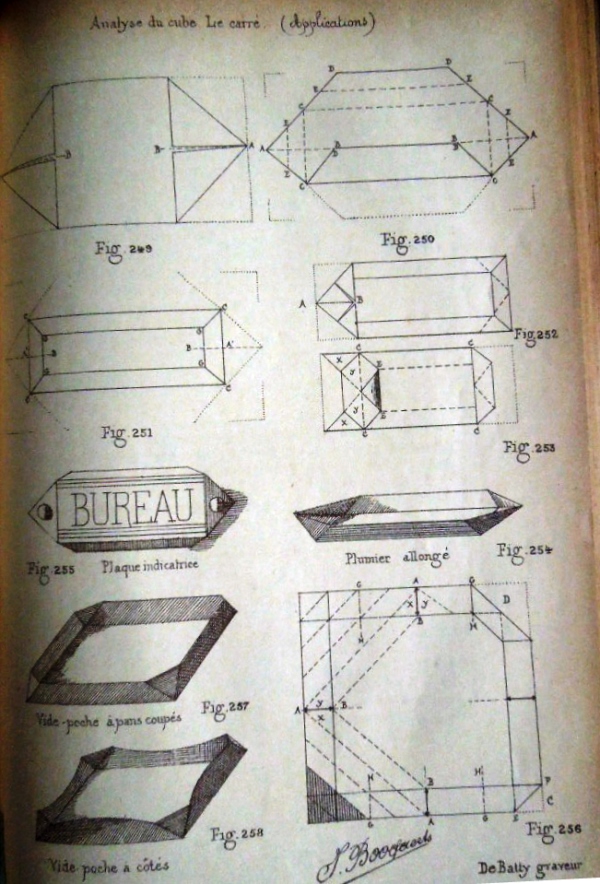
********** 2eme construction de cube - The Second Construction of the Cube (Cut) This section of the work shows how to make cubes / cuboids using cuts to create flaps which then form top and bottom of the cubes / cuboids. These faces have a diagonal slit across them and so the cubes / cuboids can be threaded onto paper strips to create decorative and geometric constructions.
********** 3eme construction de cube (avec 2 rectangles) - The Two-Ring Cube This is a two-part modular design. Two-Ring Cubes can be threaded onto paper strips to produce chains.
********** 4eme construction de cube (avec 1 carre) - The Fourth Construction of the Cube (Cut)
********** 5eme construction de cube (avec 2 carres) - The Fifth Construction of the Cube (Cut) A cubic box supplied with a separate lid. Illustrations missing. Those below are taken from Smith
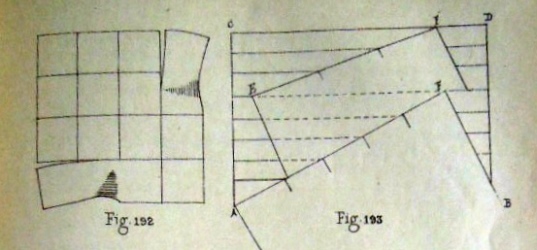
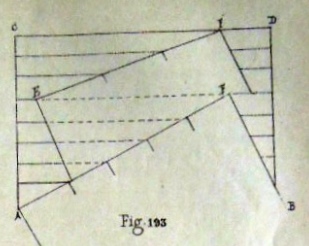
********** How to Construct a Square from Irregularly-Shaped Paper
********** The Interlocking Star The illustrations show how to produce many other decorative designs by combining multiple stars.
********** The Chrysanthemum
********** A Square Packet from a Cross
********** How to Obtain a 3x3 Grid - Trisection / Division into Thirds
********** Division into Fifths
********** The Hexagonal Rosette - and two decorative variants
********* Octagonal Decorations These two similar-looking designs can be made from the two crease patterns shown below. In the case of the left hand pattern, each corner is folded into the centre in turn. In the case of the right hand pattern, each edge is folded into the centre in turn.
********** The Pentagonal Knot
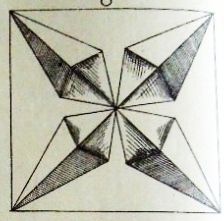
********** The Cube Corner Pyramid (Cut) The work shows how to make the basic cut version of this design, how to create variants with one, two or three truncated corners, and dimpled (inverted) and multiply dimpled / pimpled (zig-zag) forms. The diagrams also show how to make multi-piece arrangements from both the original Cube Corner design and all of the variants (for full details see below)
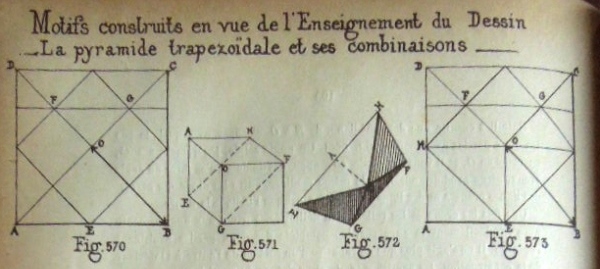
********** The Trapezoidal Pyramid (Cut)
********** The Skew Four-Sided Pyramid (Cut)
********** Five and Six-Sided Pyramids from an Octagon (Cut)
********** Open-Ended Prisms
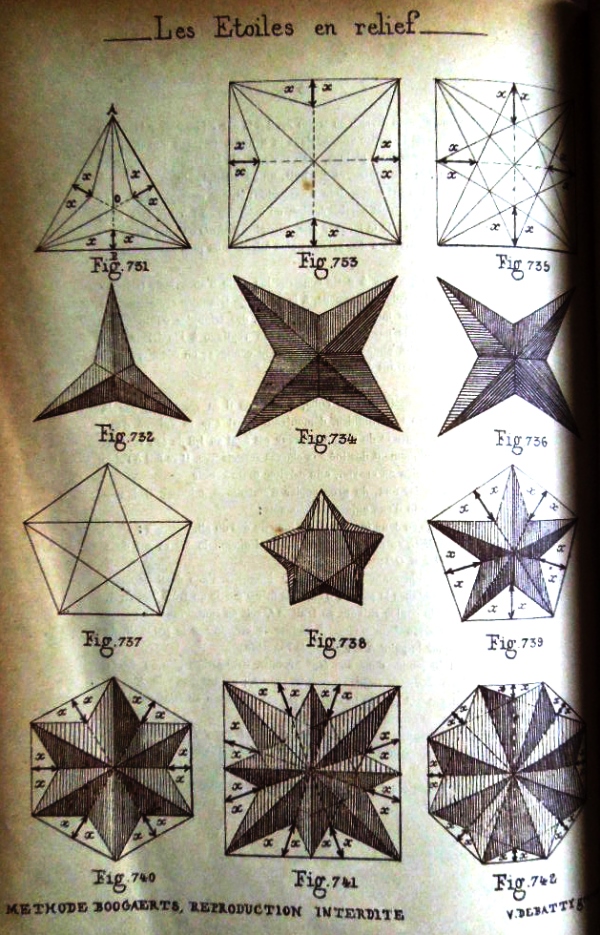
********** Three-Pointed Star (Cut)
********** The Simple Fold and Cut Four-Pointed Star - two variants
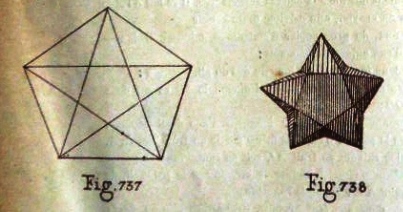
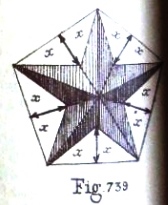
********** Five-Pointed Star (Uncut)
********** The Simple Fold and Cut Five-Pointed Star
********** The Simple Fold and Cut Six-Pointed Star
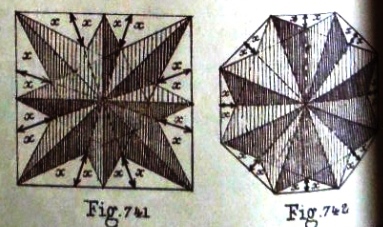
********** Fold and Cut Eight-Pointed Stars - two variants
********** Verschnuren
********** Borders and Corners
********** Braiding
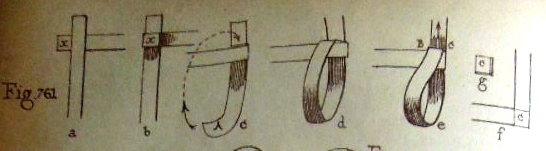
********** The Doubled Square This design, made by weaving two strips of paper together, provides a way of linking other strips together, since they can be threaded through it in either direction.
********** Roundels / Quilling patterns
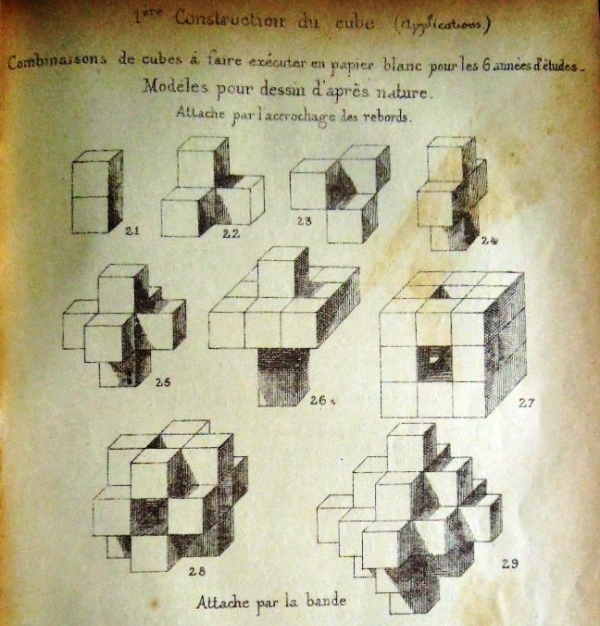
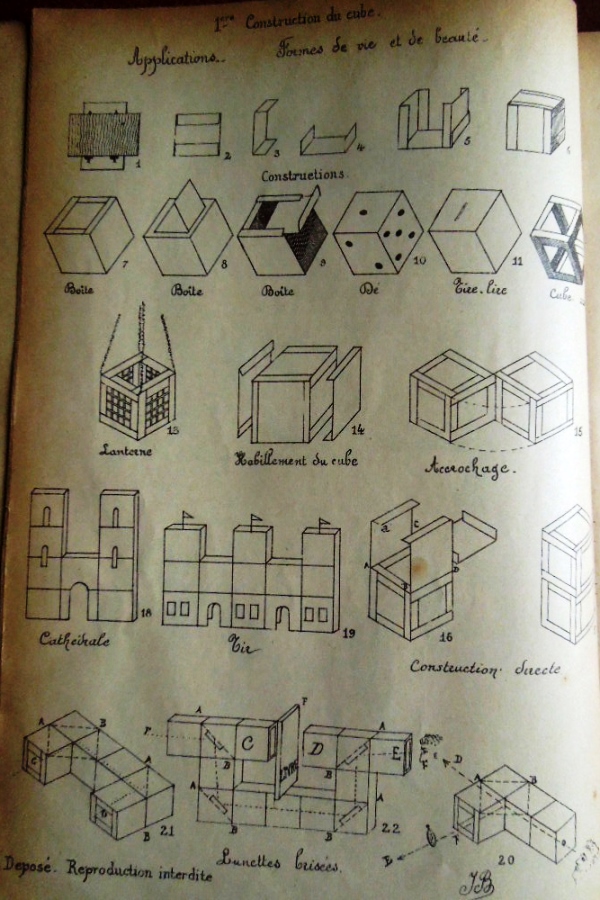
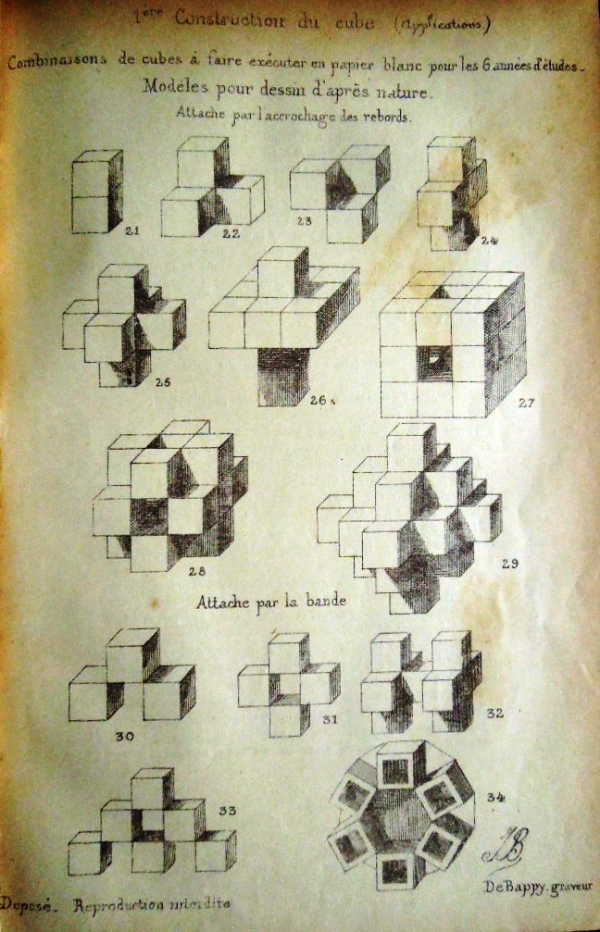
********** The Work The 'reconstruction' below attempts to marry an incomplete copy of the Figures with entries from the Index. I have noted, in brackets in italics, where Figures are currently missing from the sequence. ********** Figs 1 to 34 - 1er construction de cube (avec 6 rectangles - cartes a jouer) - The Playing Card Cube
As well as the basic construction, the illustrations also show how to cut the centres from the modules to create an outline cube, and turn this into a lantern, how to clad the cube with six other cards, how to link the cubes together by interweaving the flaps and or using joining modules to produce towers, buildings, a curious design called 'broken glasses' which uses mirrors inside the cubes, and several geometric forms.
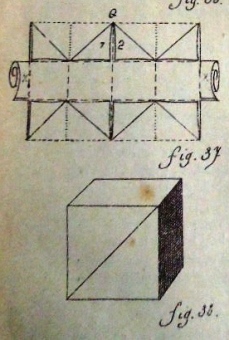
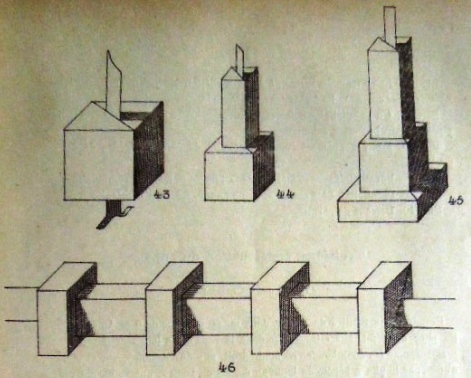
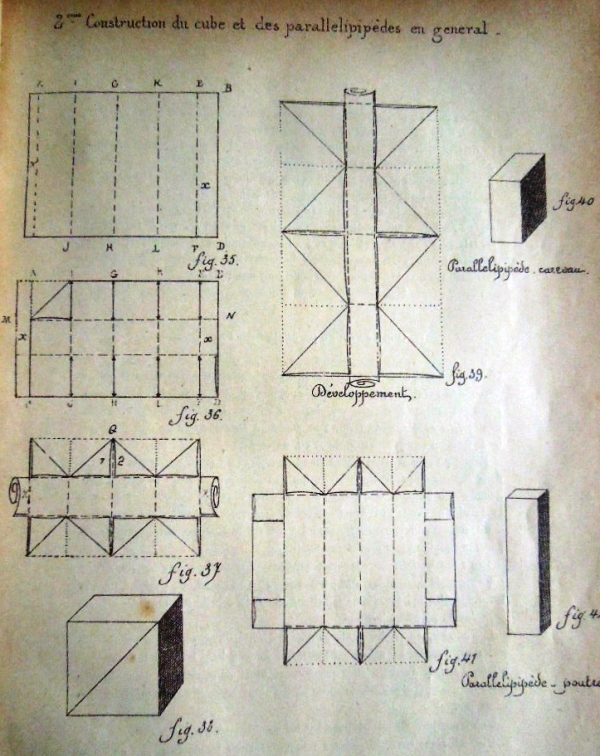
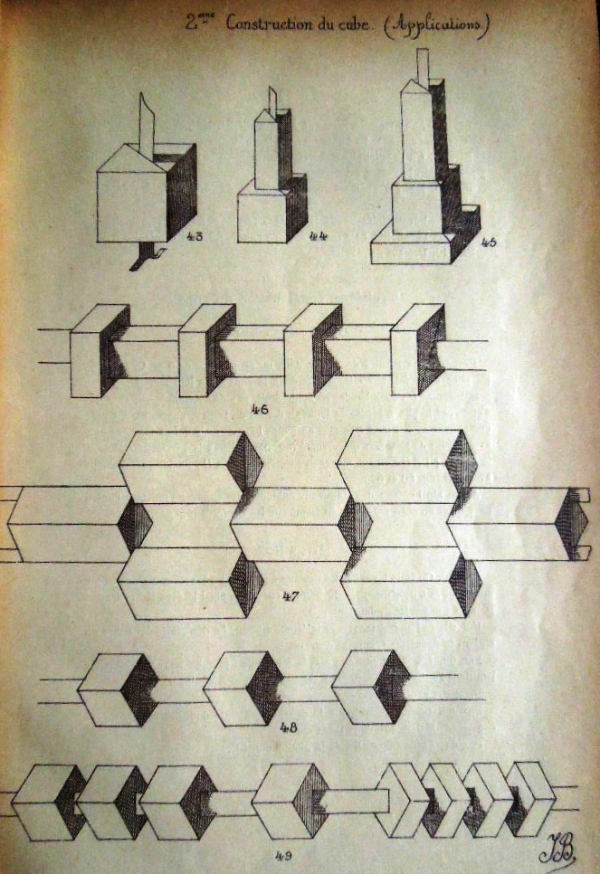
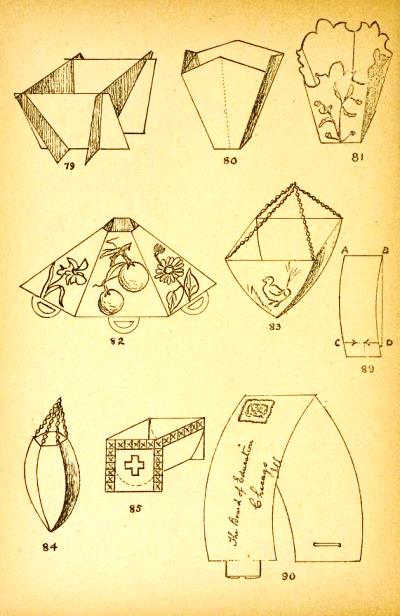
********** Figs 35 to 49 - 2eme construction de cube (from a rectangle) - The Second Construction of the Cube (Cut)
Cuts are used to create flaps that are used to make the top and bottom of the cube. These faces have a diagonal slit across them and so the cubes can be threaded onto paper strips to create decorative and geometric constructions.
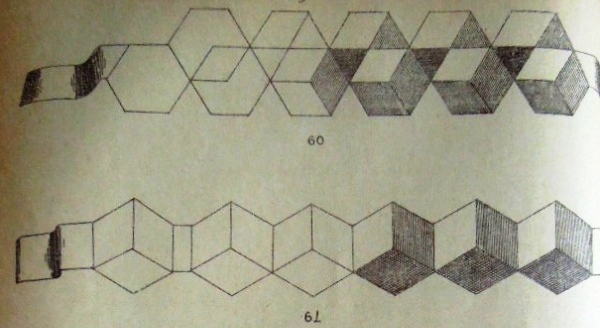
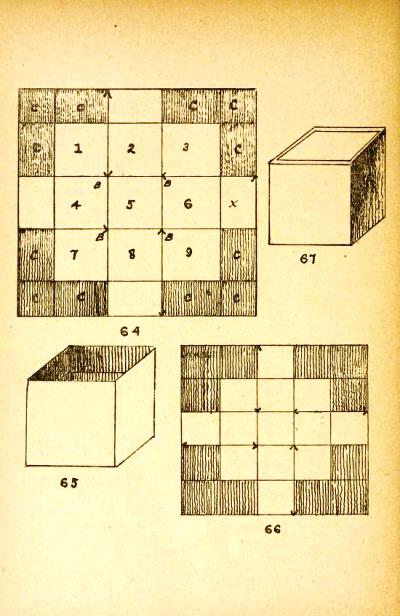
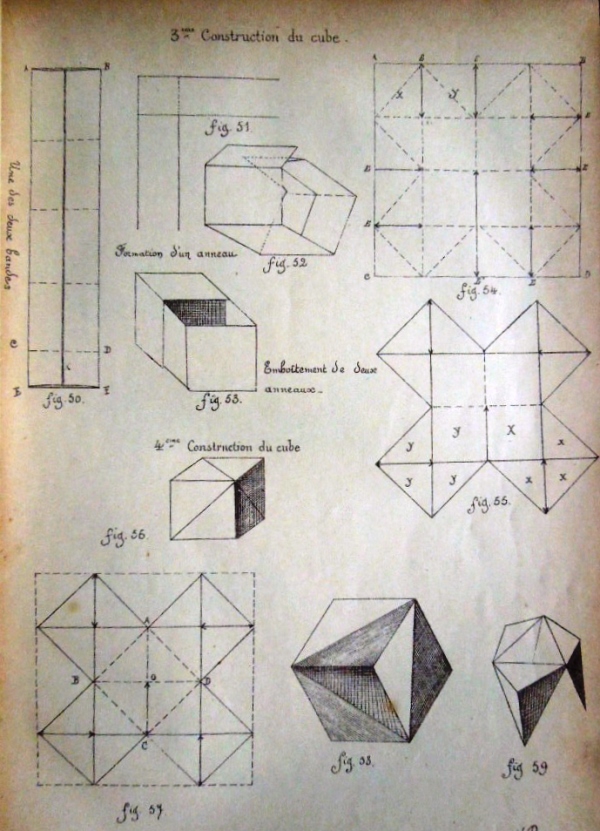
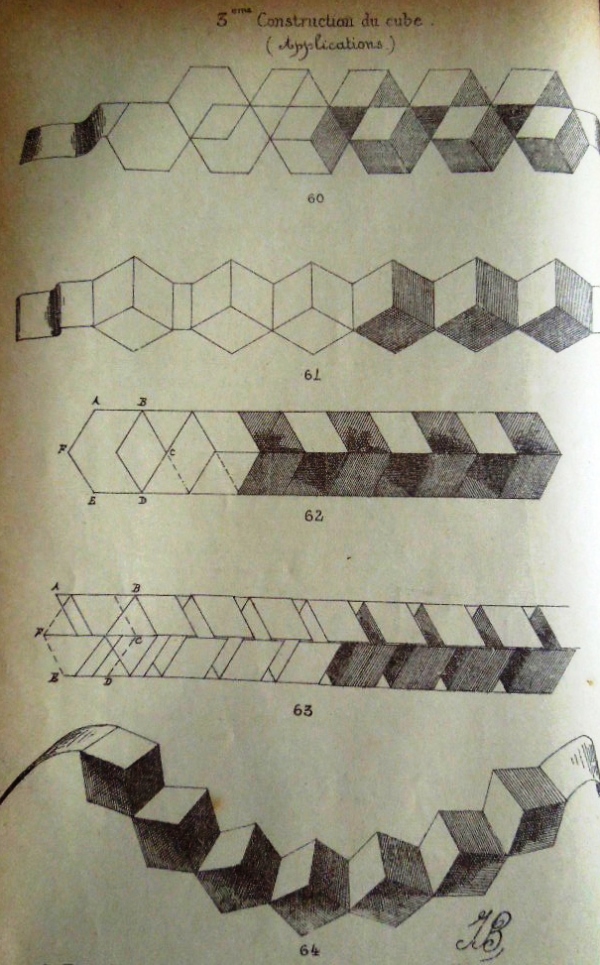
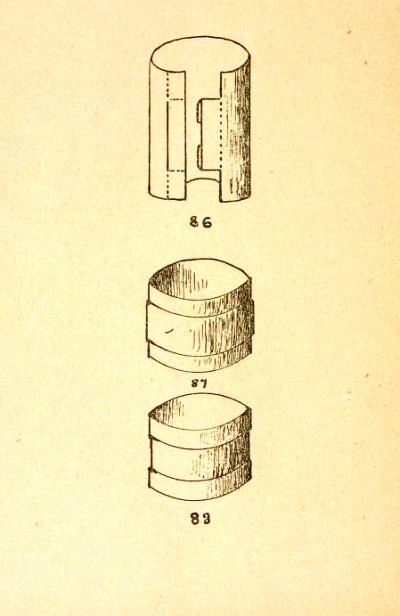
********** Figs 50 to 53 and 60 to 64 - 3eme construction de cube (avec 2 rectangles) - The Two-Ring Cube
This is a two-part modular design. Cubes can be threaded onto paper strips to produce chains.
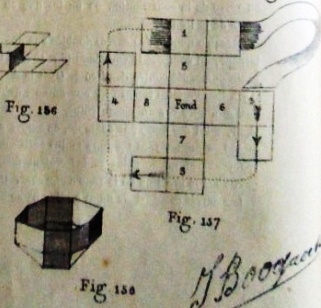
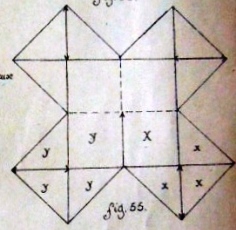
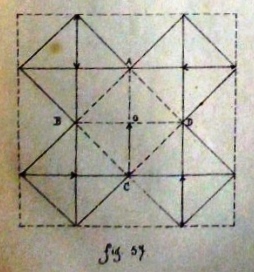
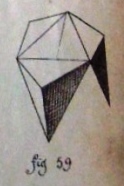
********** Figs 56 to 59 - 4eme construction de cube (avec 1 carre) - The Fourth Construction of the Cube (Cut)
See above. This cube is heavily cut. Picture 58 shows a cube of which one corner has been inverted. ********** (Pages showing Figs 65 to 90 are missing) **********
5eme construction de cube (avec 2 carres) - The Fifth Construction of the Cube (Cut) In Smith, the 5th Construction of the Cube is a cubic box missing one face, which is then supplied by a separate lid. It is almost certain that the design in this work is the same.
**********
6eme construction de cube (avec 6 carres) - The Sixth Construction of the Cube In Smith the 6th Construction of the Cube is a cube made from six cardboard faces each of which is supplied with tabs and pockets to link them together. It is almost certain that the design in this work, and its derivative forms, are the same.
**********
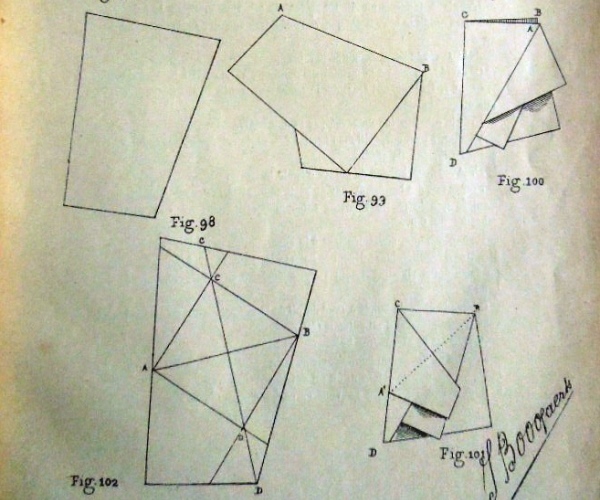
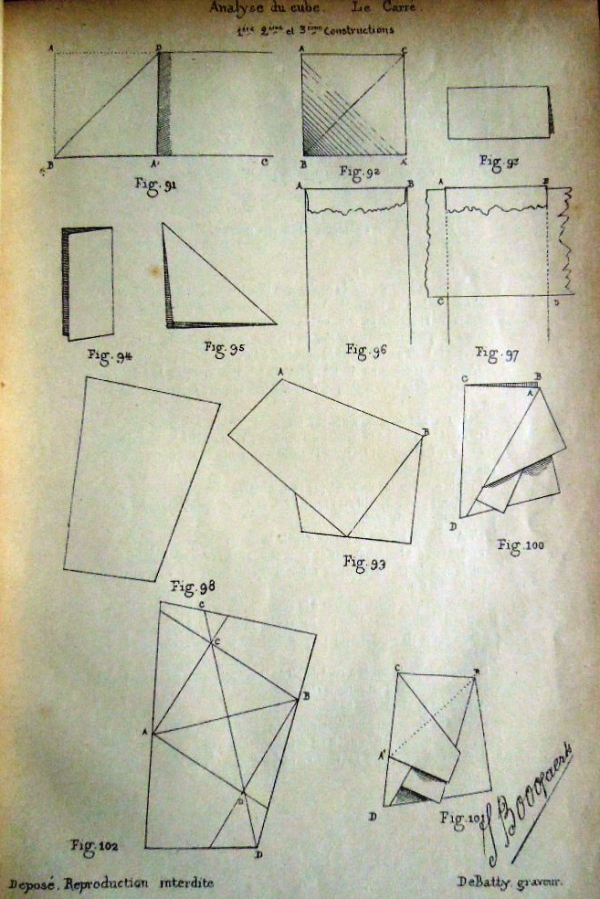
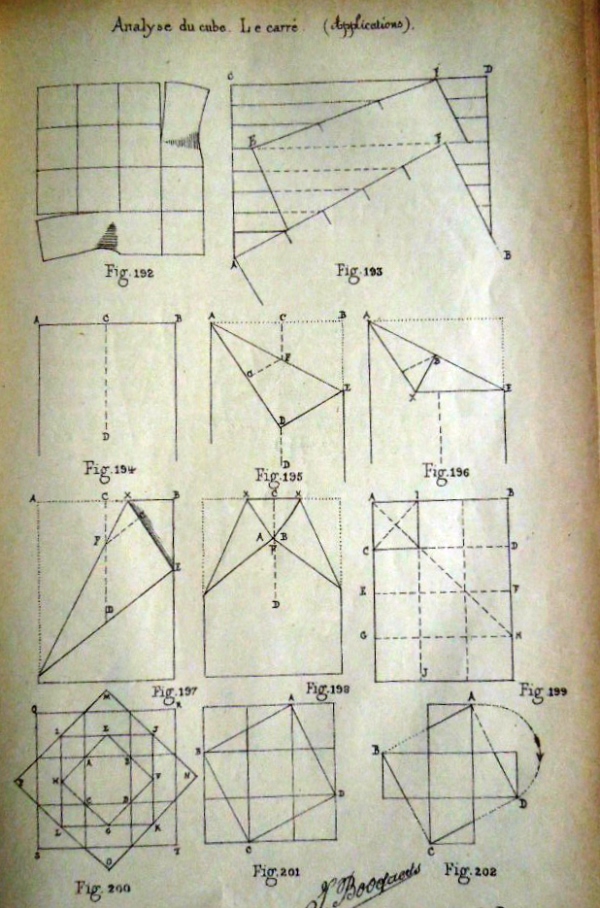
Figs 91 to 102 appear to relate to this section of the Index. They show how to obtain a square from a strip of paper, then (in quantity) from two crossed strips and then from paper of an irregular shape.
********** (Pages showing Figs 103 to 110 are missing.)
**********
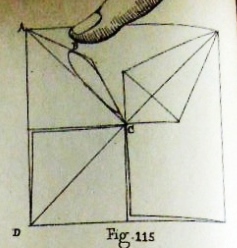
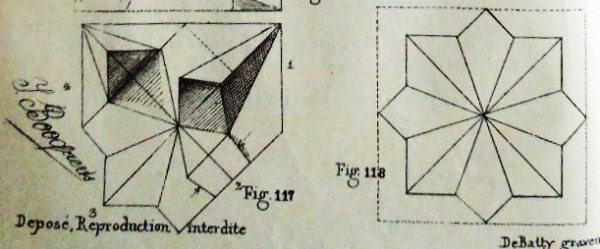
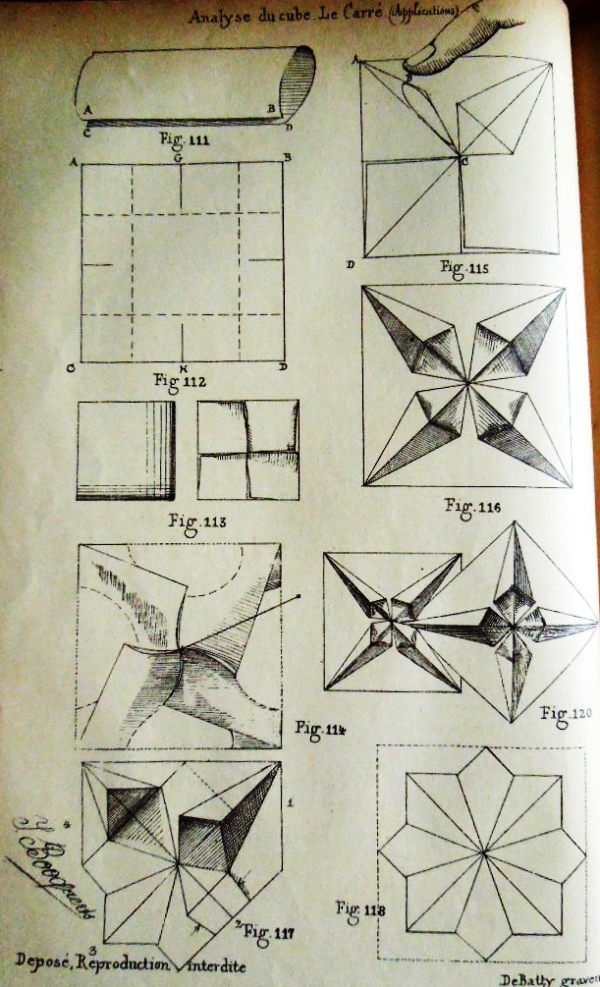
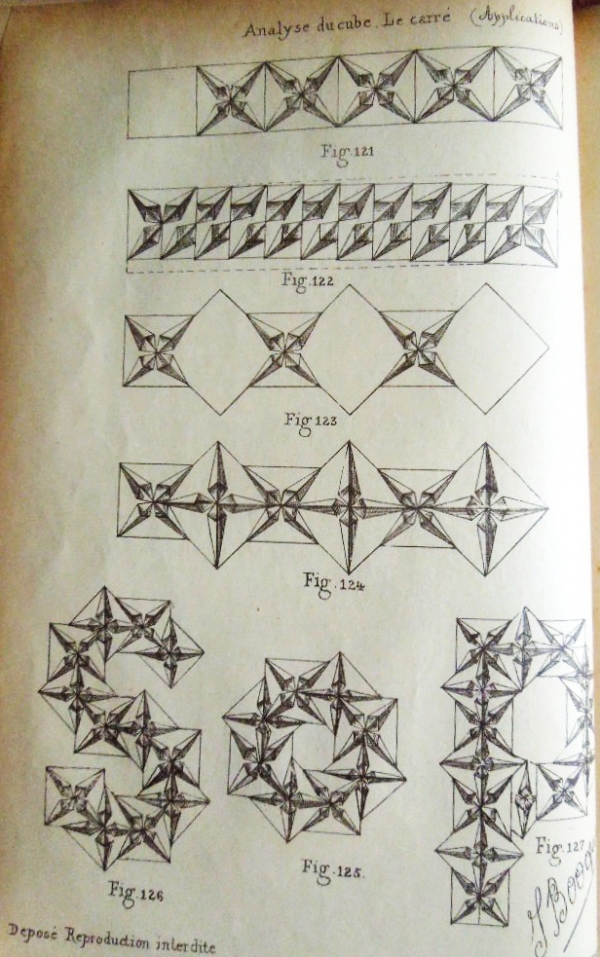
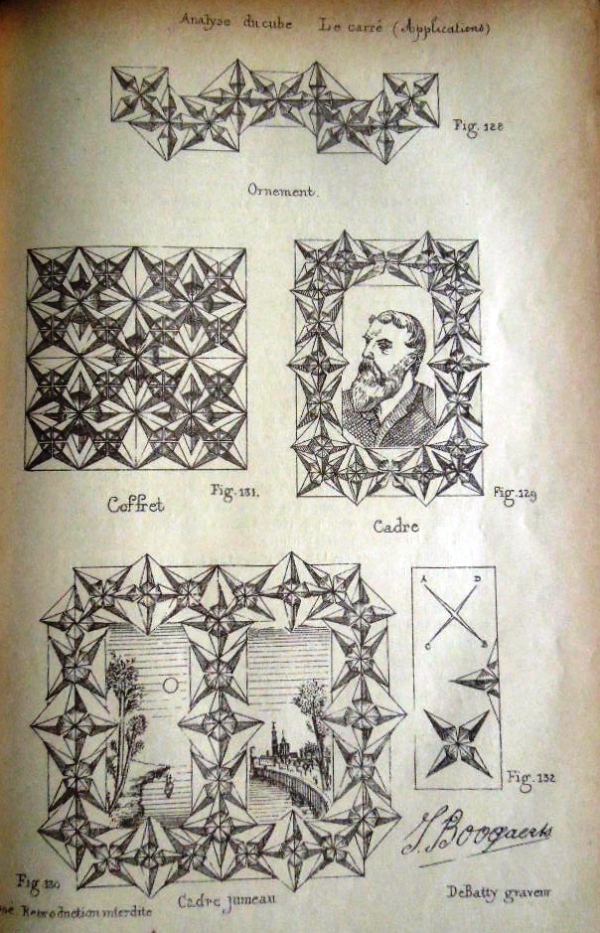
Figs 111 to 112 show how to create a base made by folding all the edsges of a square inwards - 'Le carre a rebords imbriques'. Figs 113 to 116 show how to fold 'Le carre etoile' - The Interlocking Star. Figs 117 and 118 show how to turn it into The Chrysanthemum. Figs 120 to 132 show how to combine Interlocking Stars to create compound designs.
**********
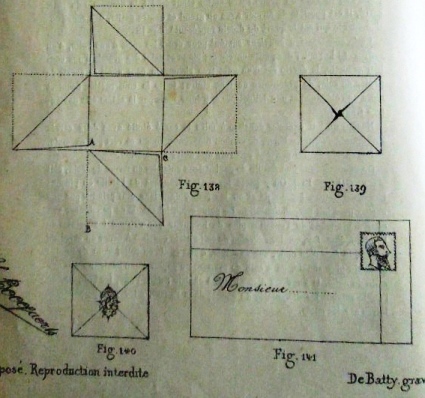
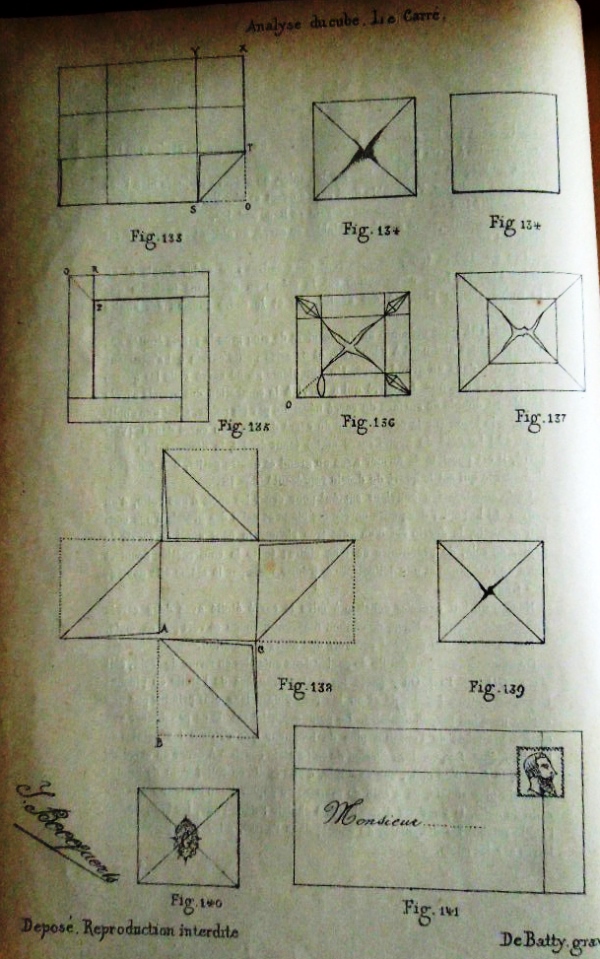
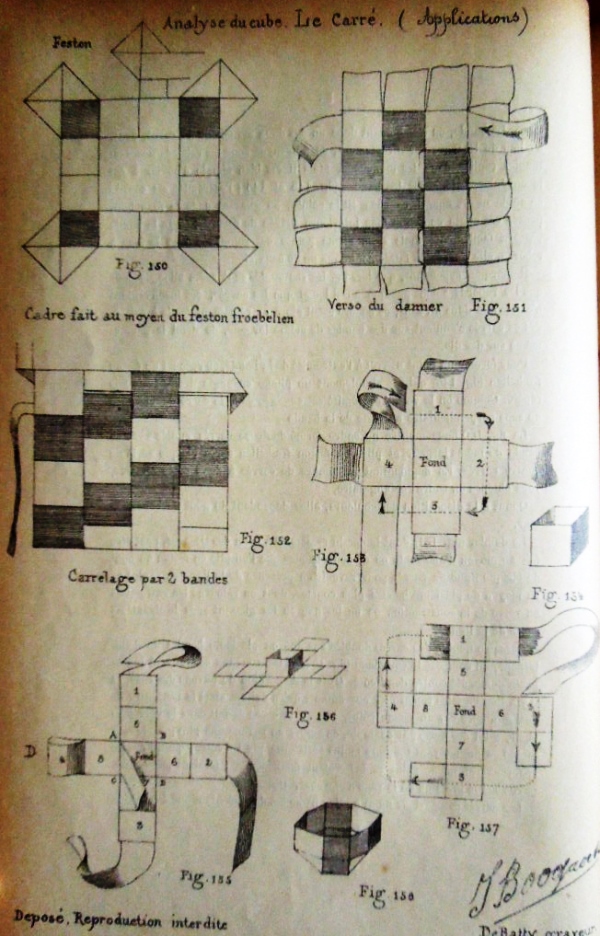
Figs 133 to 137 show a number of simple frames. Figs 138 to 139 explain how to fold A Square Packet from a Cross, and 140 shows it sealed for use as a letterfold. Fig 141 shows another letterfold, perhaps developed from the frame shown in Fig 135.
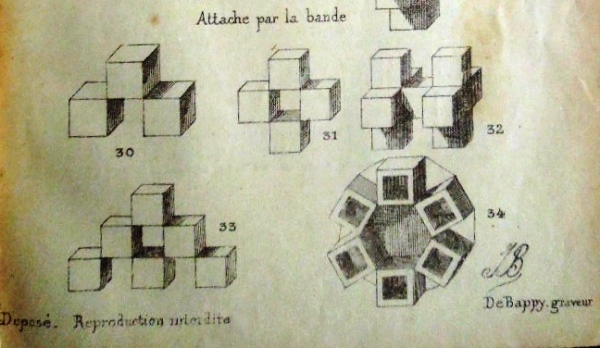
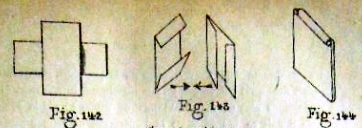
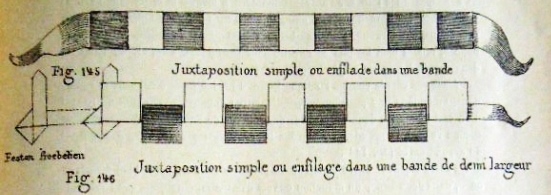
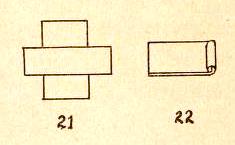
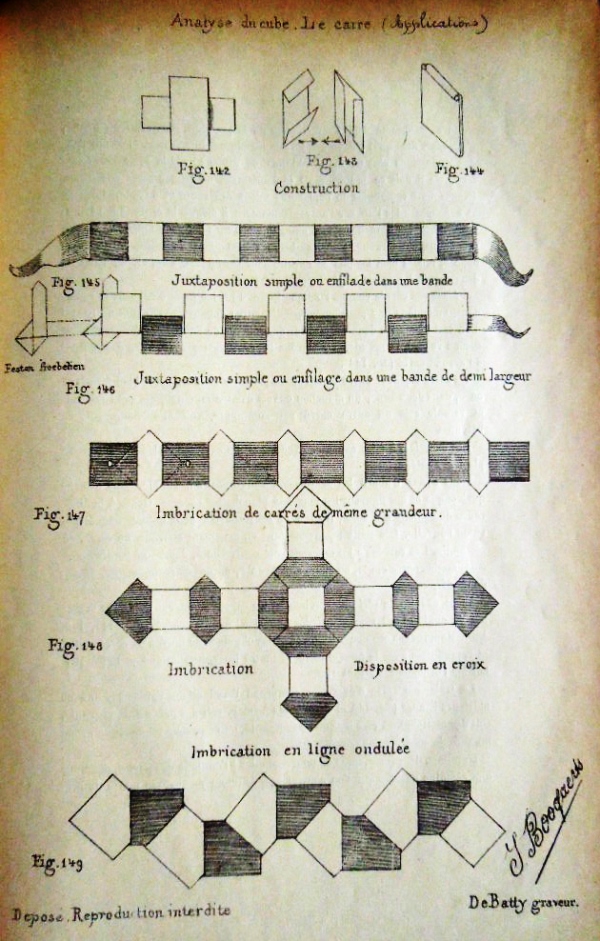
********** Figs 142 to 144 show how to make 'Le Carre Double' a two-part modular design - The Playing Card Square
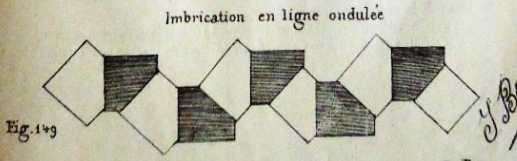
Figs 145 to 158 show how these designs can be combined in various ways, either by simply being slipped inside each other or by being threaded onto paper strips, in one or both directions, to create many two and three-dimensional forms.
********** (Figs 159 to 191 are missing from the sequence here.) ********** Smith gives additional designs made from The Playing Card Square, which are presumably the first of the Figures missing here (ie nos 160 to 164). The last two are almost certainly 'Le rectangle double' - The Double Rectangle design,
**********
The following pages clearly relate to this section of the work, but I have not been able to marry them to the entries in the Index with sufficient understanding of what they are supposed to show.
**********
**********
********** (Figs 232 to 240 are missing from the sequence here.) **********
**********
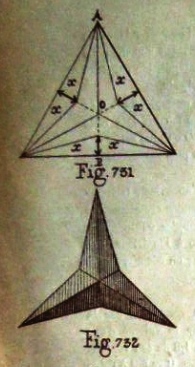
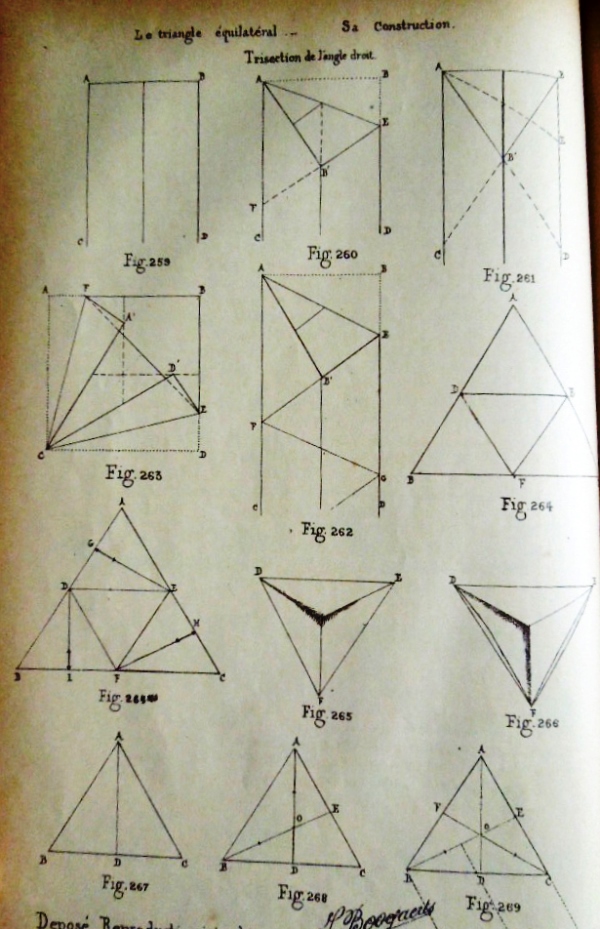
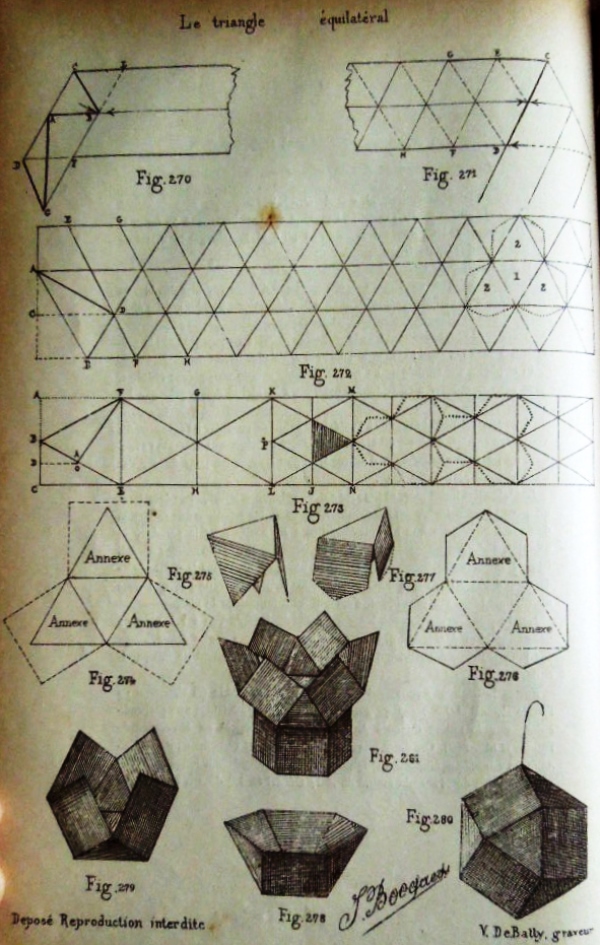
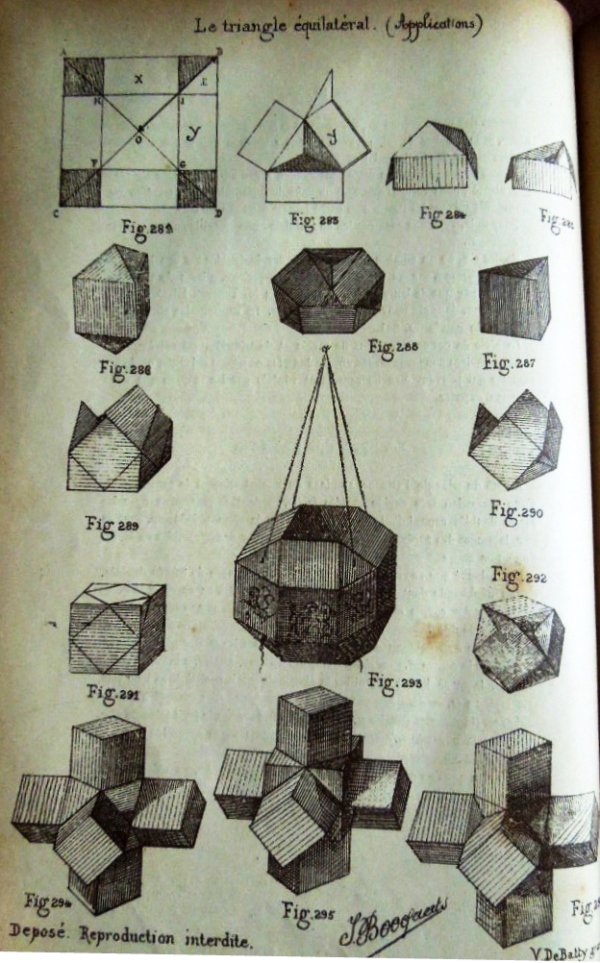
********** Figs 259 to 295 - The Equilateral Triangle Without the relevant text I am not sure what many of the Figures are intended to show.
**********
**********
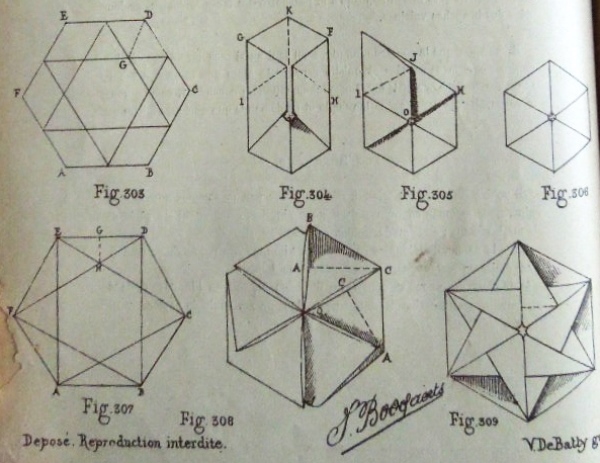
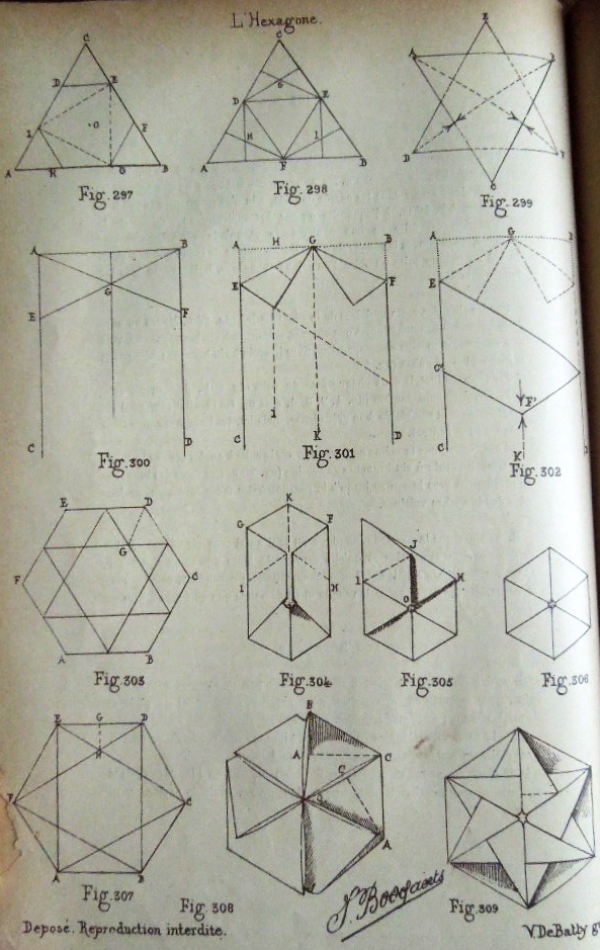
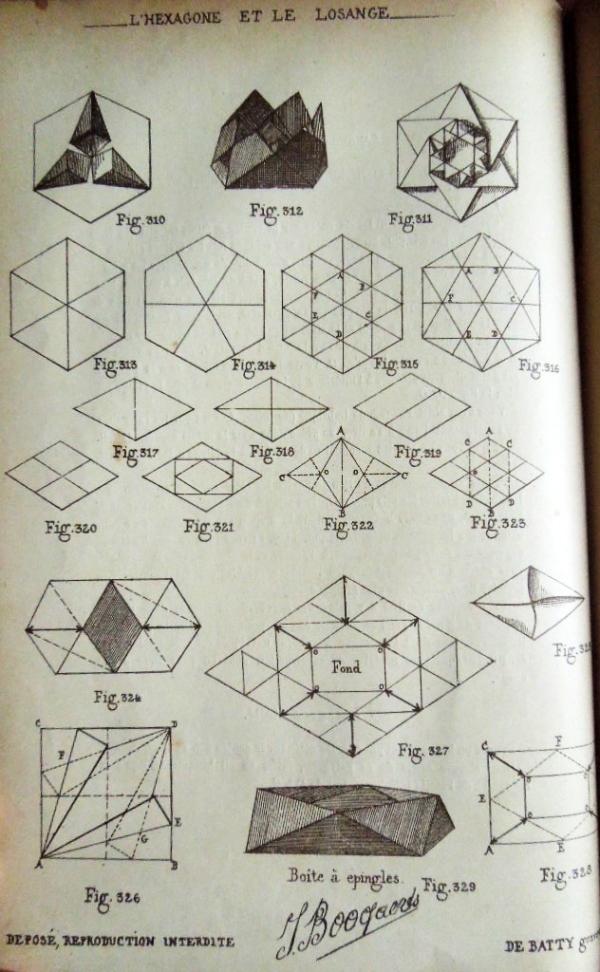
********** Figs 297 to 316 - The Hexagon Without the relevant text I am not sure what many of the Figures are intended to show.
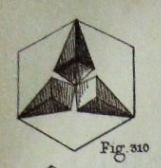
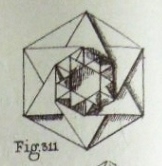
Figs 297 to 302 provide two ways of constructing a hexagon: 297/8 from an equilateral triangle 300/2 from a rectangle Without the text I do not understand the significance of 299. Figs 303 to 309 show how to construct 'L'exagone a rebords imbriques' and The Hexagonal Rosette Fig 311 shows another hexagonal decoration developed from the Hexagonal Rosette Fig 310 shows what is presumably 'L'ecran de lampe', a hexagonal decoration made by squashing just three of the arms of 'L'exagone a rebords imbriques' Fig 312 shows what is presumably 'La Corbeille', a bowl made by opening up the Hexagonal Rosette.
********** The Losange (see above) Without the relevant text I am not sure what many of the Figures are intended to show.
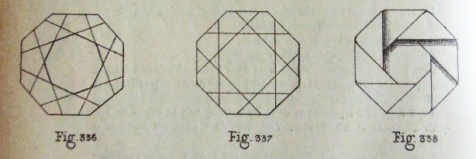
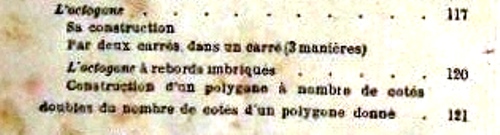
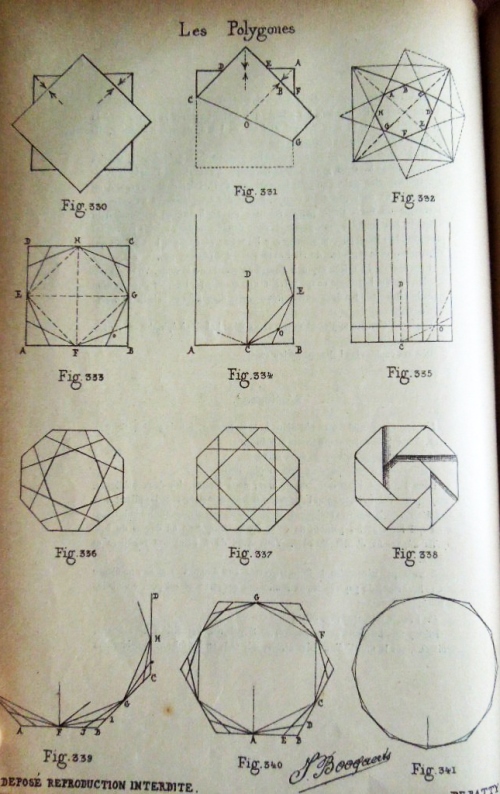
********** The Octagon
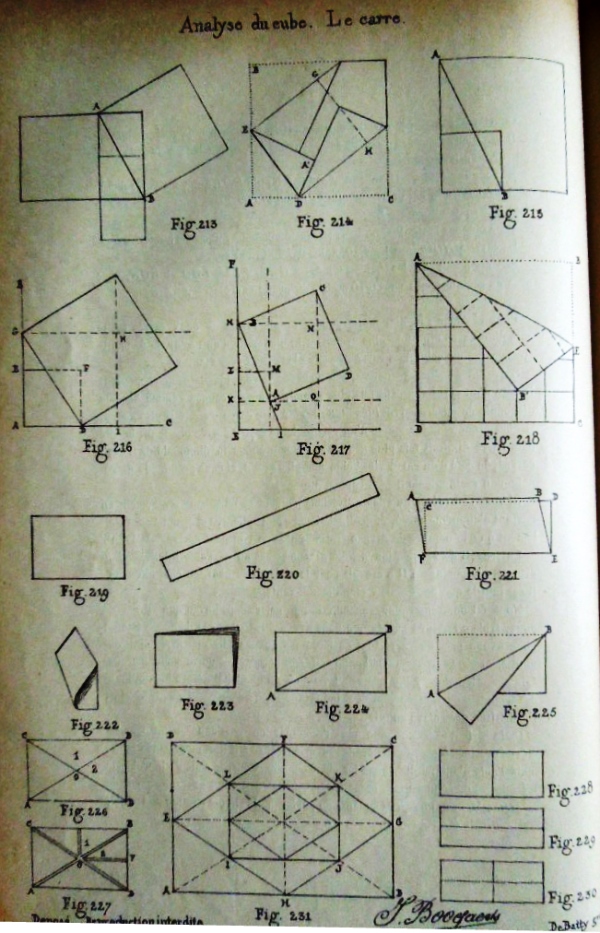
Fig 330 shows how to construct an octagon using two squares. Fig 331 shows how to construct an octagon from a single square by overlaying a bisector on a diagonal. Fig 332 shows how to construct an octagon from a single square by folding the edges onto the diagonals. Fig 333 shows how to construct an octagon from a blintzed square. Fig 334 shows how to apply a similar method to a rectangle. Figs 336 and 337 shows two crease patterns made by folding the edges / corners to the centre, each of which will collapse into a 'L'octagone a rebords embriques' although neither is illustrated. I do not know how to obtain the octagon show in Fig 338 Figs 339 to 341 show how to double the number of edges of an octagon to obtain a sixteen-sided polygon.
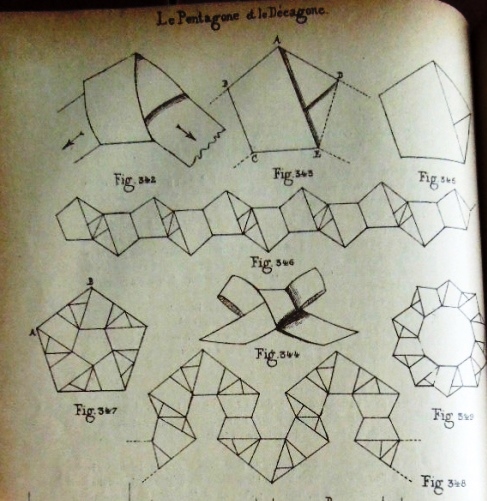
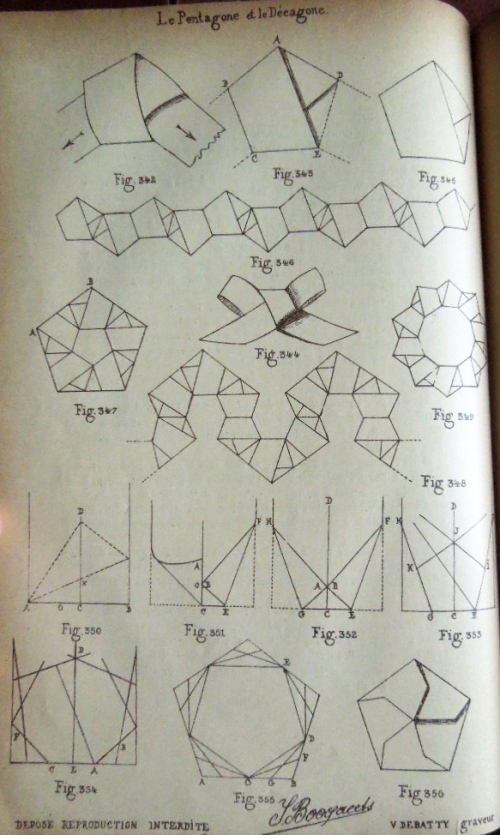
********** Figs 342 to 356 - The Pentagon
Figs 342 to 34349 show The Pentagonal Knot and constructions made using it. Figs 350 to 353 show a method of constructing a regular pentagon from a rectangle. Fig 354 shows a method of constructing an enneagon (nonagon) from a rectangle. Fig 355 shows how to double the number of sides of the pentagon to produce a decagon. Fig 356 shows a 'Pentagone a rebords embriques' made by folding all sides to the centre.
**********
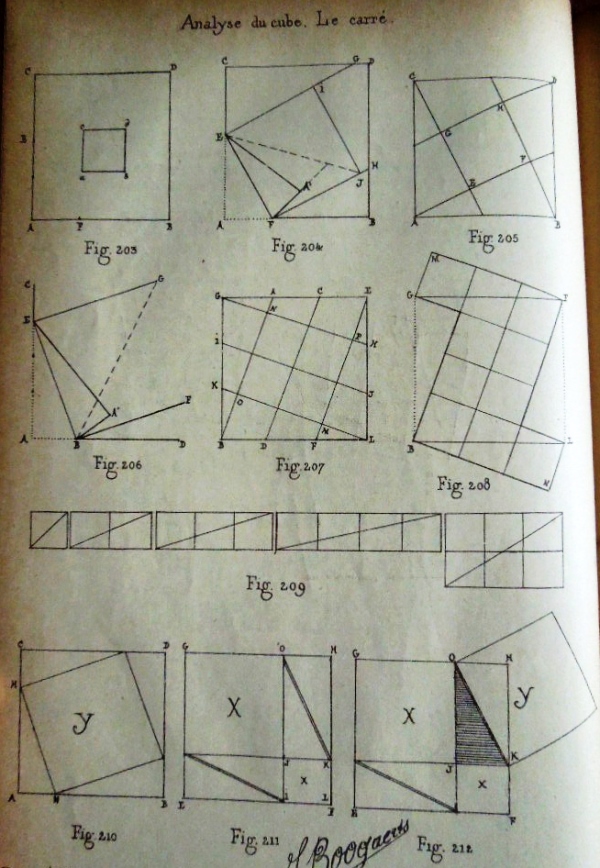
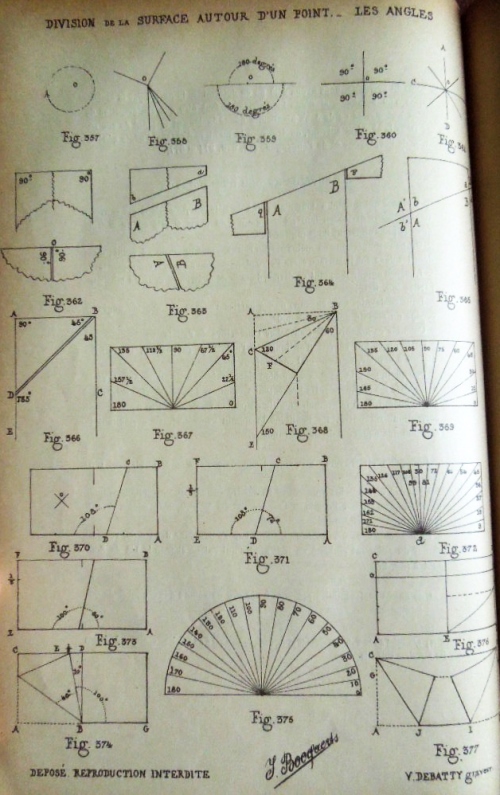
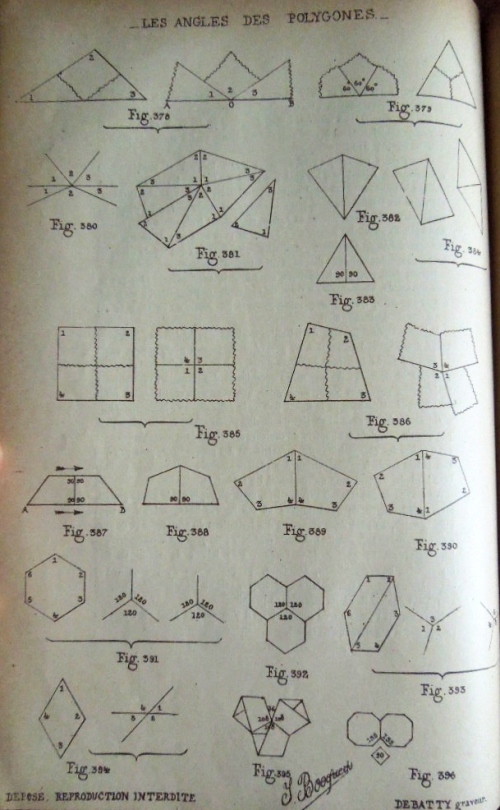
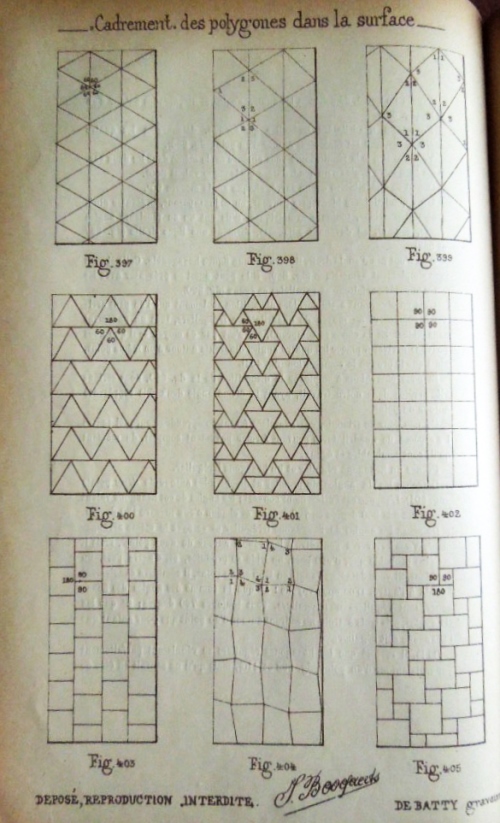
Figs 357 to 396 show various ways in which the angles of polygons can be constructed by folding. Figs 397 to 414 are examples of tiling patterns. I do not have access to the pages which carry Figs 415 to 443. Figs 444 and 445 do not relate to paperfolding.
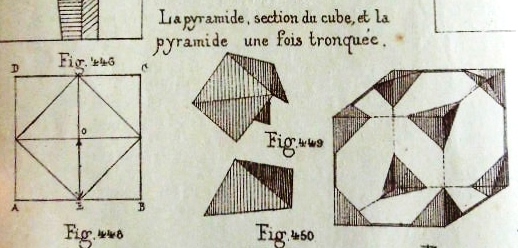
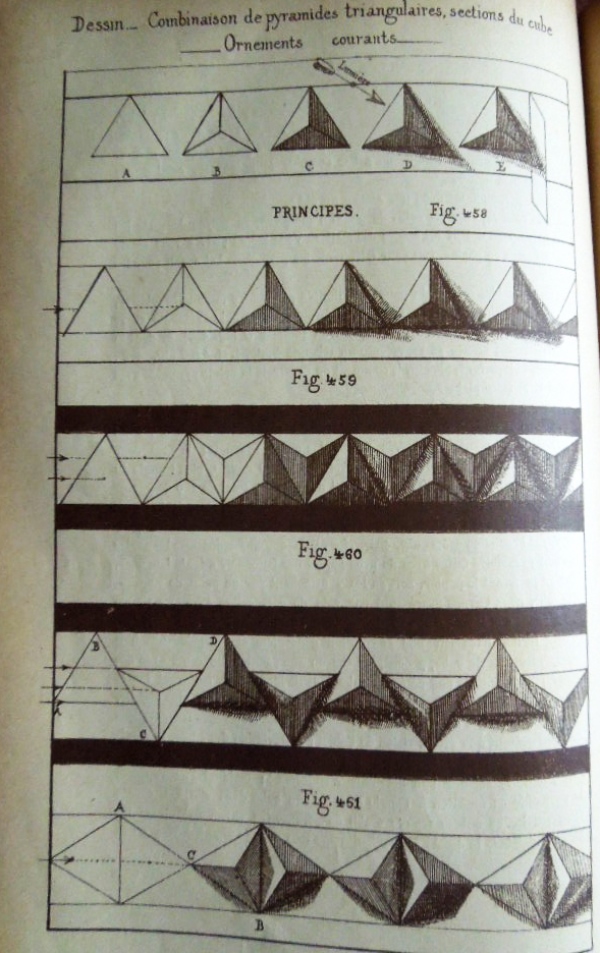
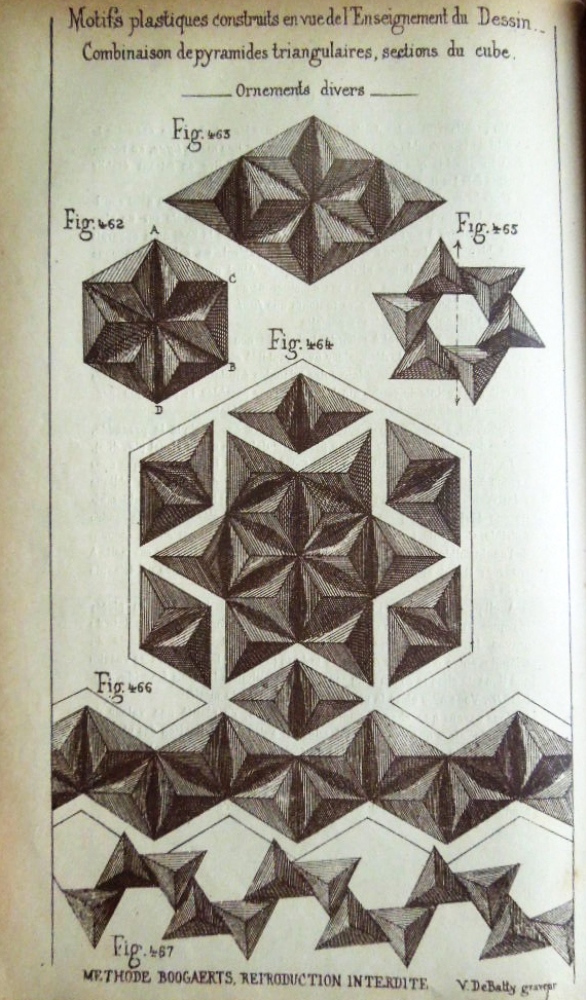
********** (Figs 415 to 443 are missing here) ********** Les Motifs Plastiques (Pyramids and Truncated Pyramids)
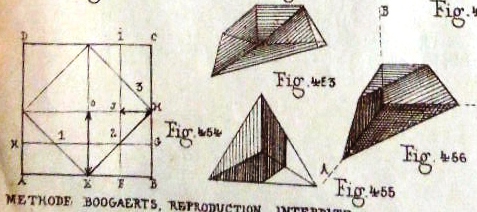
********** Figs 448 to 452 show how to construct La pyramide triangulaire - The Cube Corner Pyramid (Cut) Figs 458 to 467 show designs that can be made using this construction.
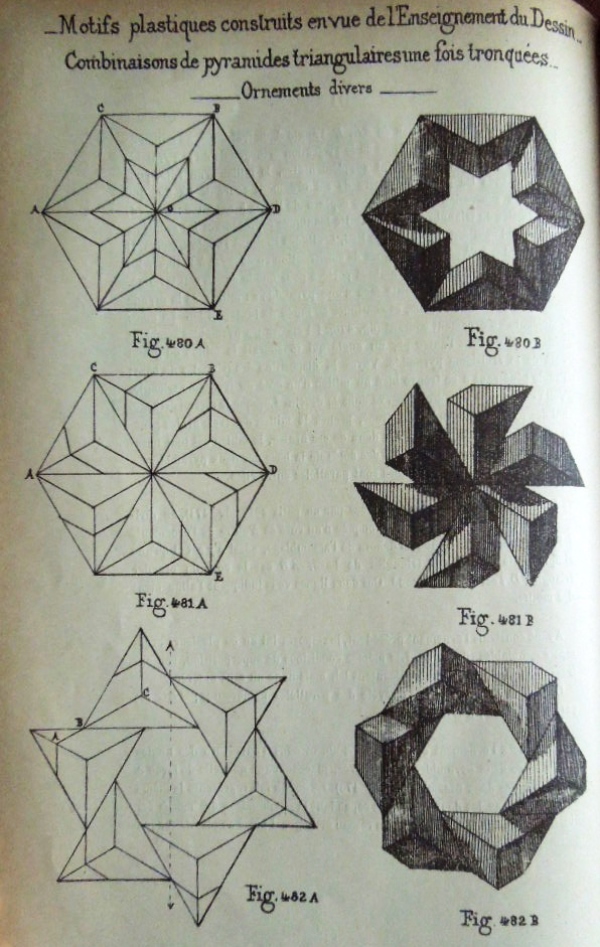
********** Figs 453 to 457 show how to construct 'La pyramide triangulaire une fois tronquees' - The Truncated Cube Corner Pyramid (Cut) Figs 468 to 482B show designs that can be made using this construction.
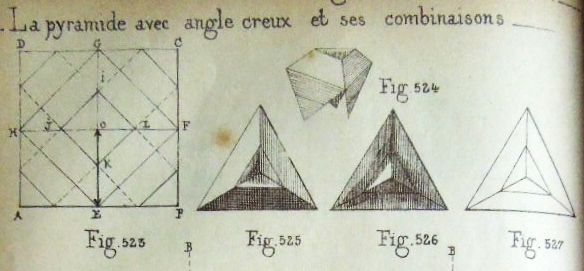
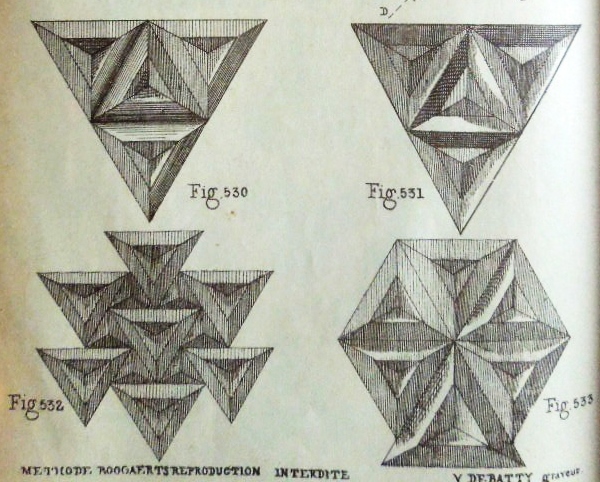
********** Figs 523 to 527 show how to construct 'La pyramide avec angle creux' - The Inverted Cube Corner Pyramid (Cut) 530 to 533 show designs that can be made using this construction.
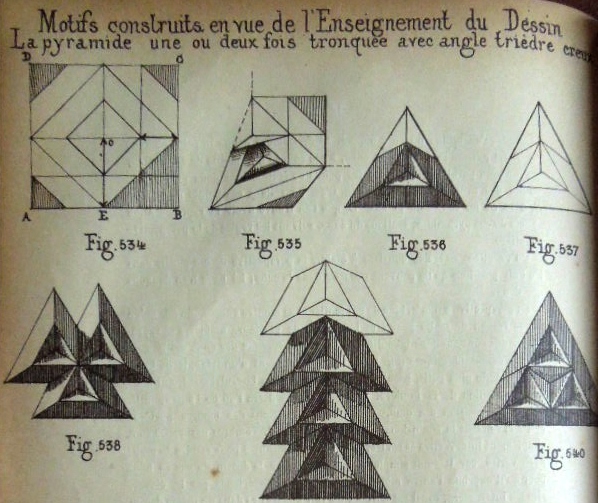
********** Figs 534 to 537 show how to construct The Truncated Inverted Cube Corner Pyramid (Cut). Figs 538 to 540 show designs that can be made using this construction.
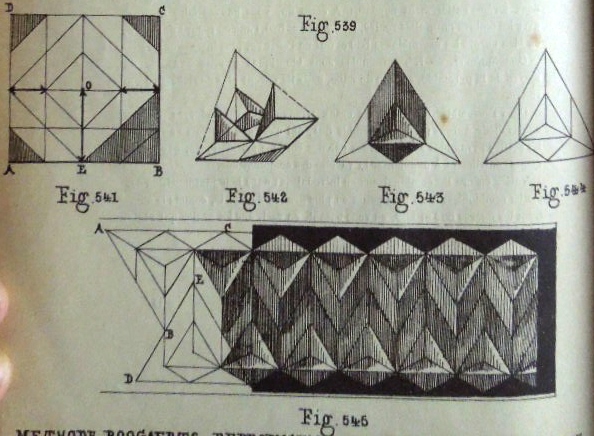
********** Figs 541 to 545 show how to construct The Doubly Truncated Inverted Cube Corner Pyramid (Cut) Fig 545 shows a design made using this construction.
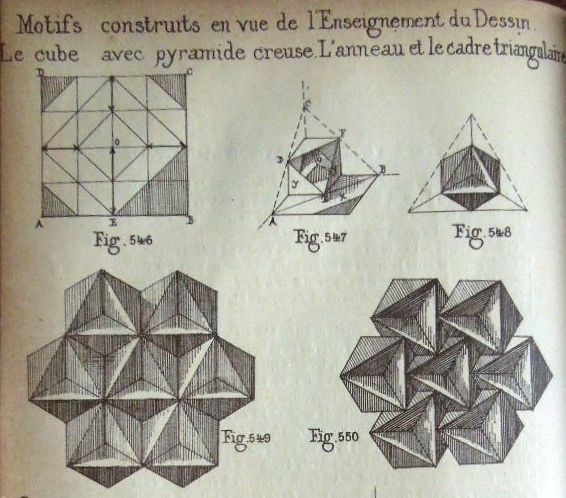
********** Figs 546 to 548 show how to construct The Triply Truncated Inverted Cube Corner Pyramid (Cut) Figs 549 to 550 show designs that can be made using this construction
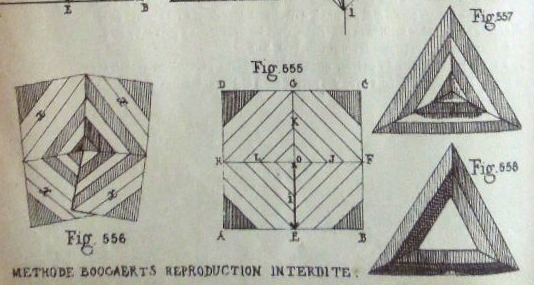
********** Figs 555 to 558 show how to construct The Zig-Zag Cube Corner Pyramid (Cut)
********** Figs 559 to 562 show how to construct The Outline Cube Corner Pyramid (Cut) Figs 563 to 564 show designs that can be made using this construction
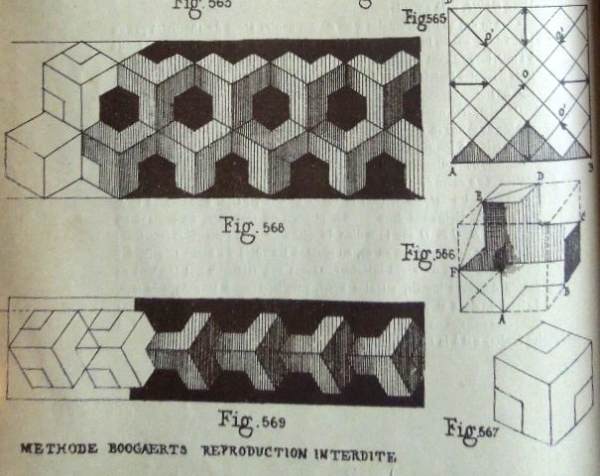
********** Figs 565 to 567 show how to construct The Triply Truncated Outline Cube Corner Pyramid (Cut) Figs 568 to 569 show designs that can be made using this construction
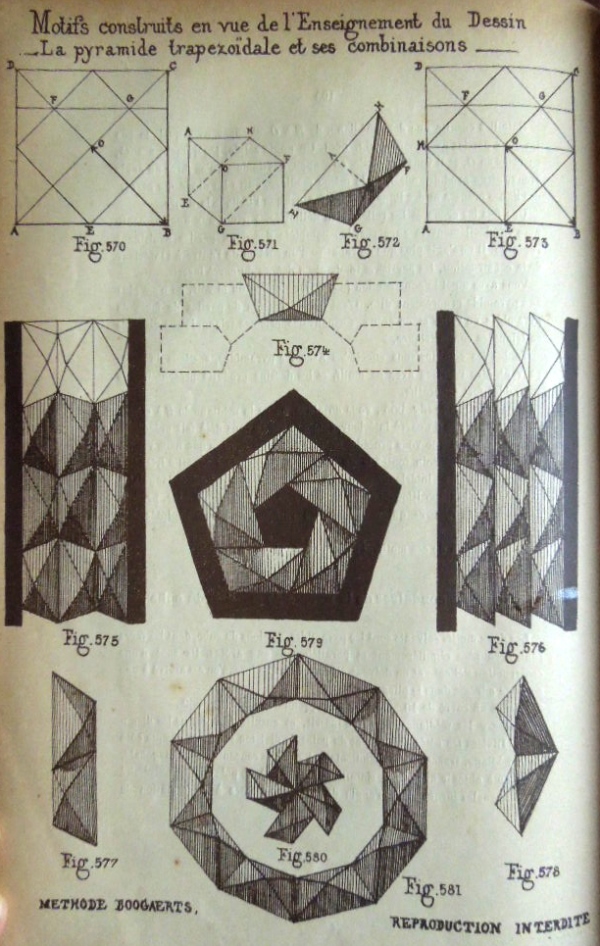
********** Figs 570 to 574 show how to construct The Trapezoidal Pyramid (Cut) Figs 575 to 581 show designs that can be made using this construction
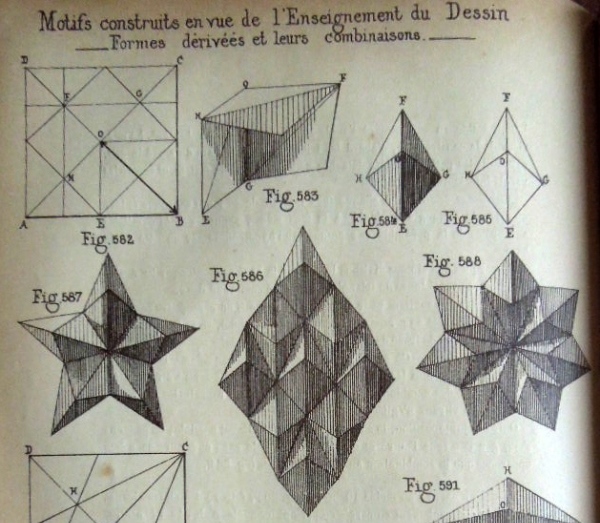
********** Figs 582 to 586 show how to construct The Skew Four-Sided Pyramid (Cut) Figs 587 to 588 show designs that can be made using this construction
********** Figs 589 to 592 show how to construct The Irregular Three-Sided Pyramid (Cut) Figs 593 to 595 show designs that can be made using this construction
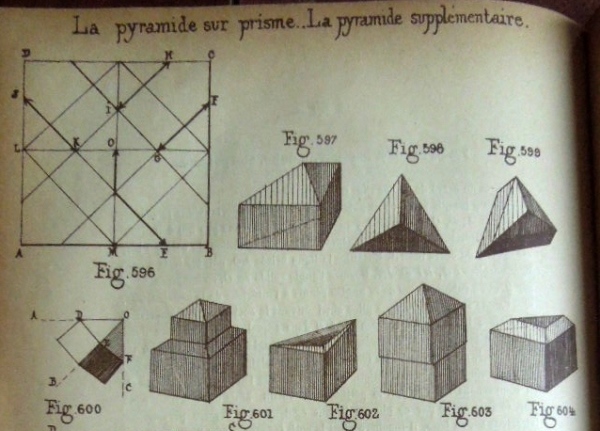
********** Figs 596 to 600 show how to construct a Pyramid on a Prism (Cut) Figs 601 to 604 show variations on this design.
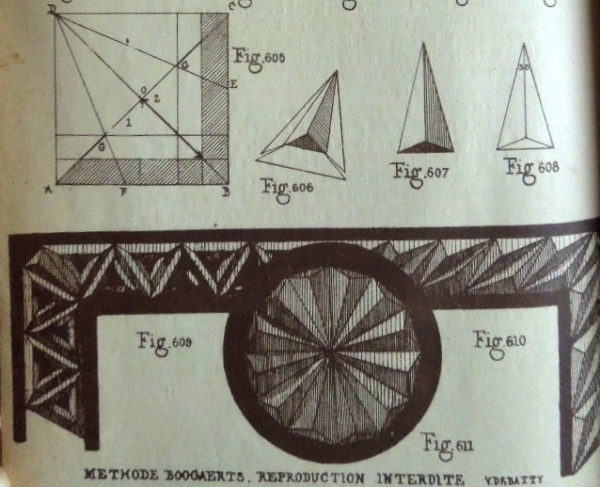
********** Figs 605 to 608 show how to construct a Supplementary Pyramid (Cut) Figs 609 to 611 show what can be done with this design.
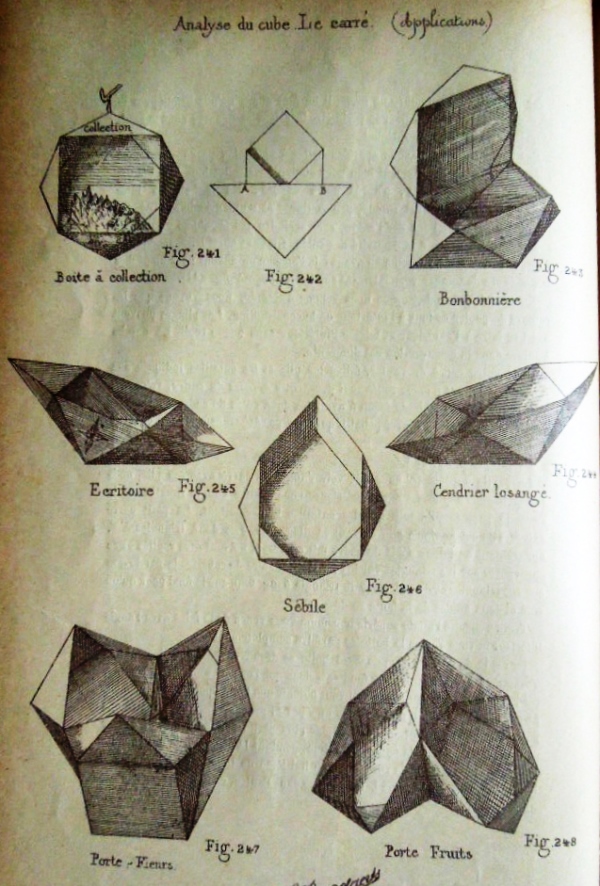
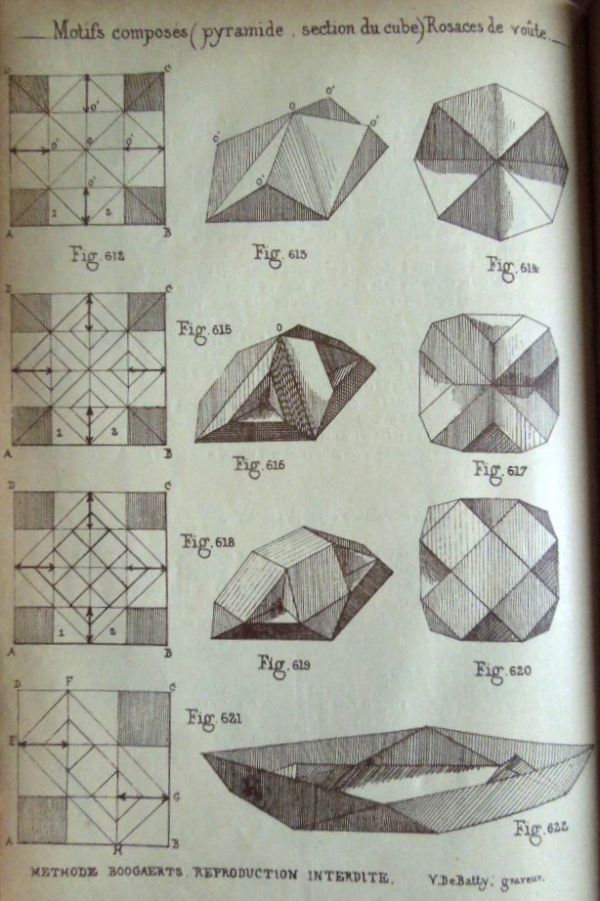
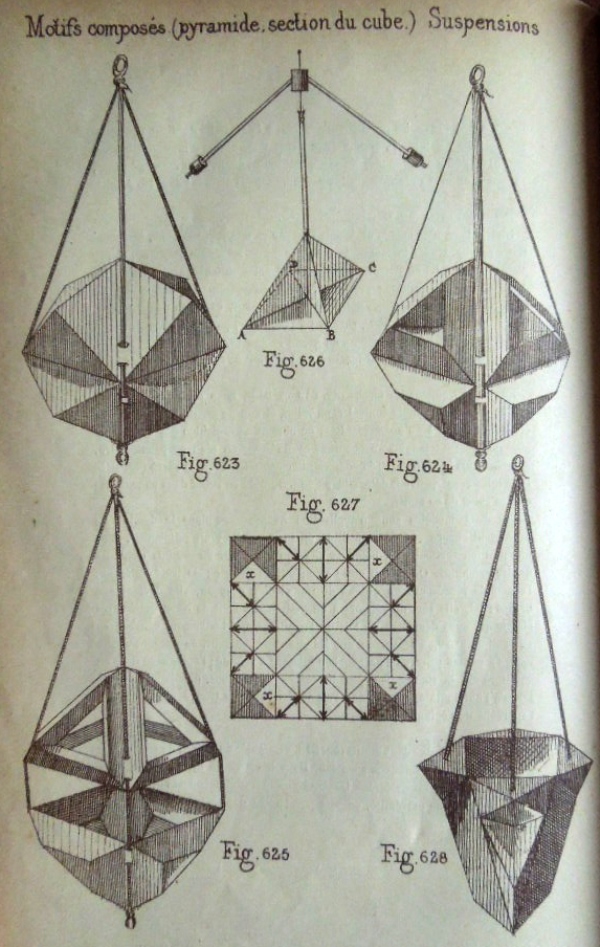
********** Figs 612 to 628 show how to construct Five Cut Geometric Forms and how to turn them into hanging ornaments.
********** (Figs 627 to 673 are missing here.) **********
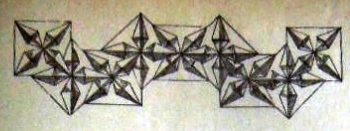
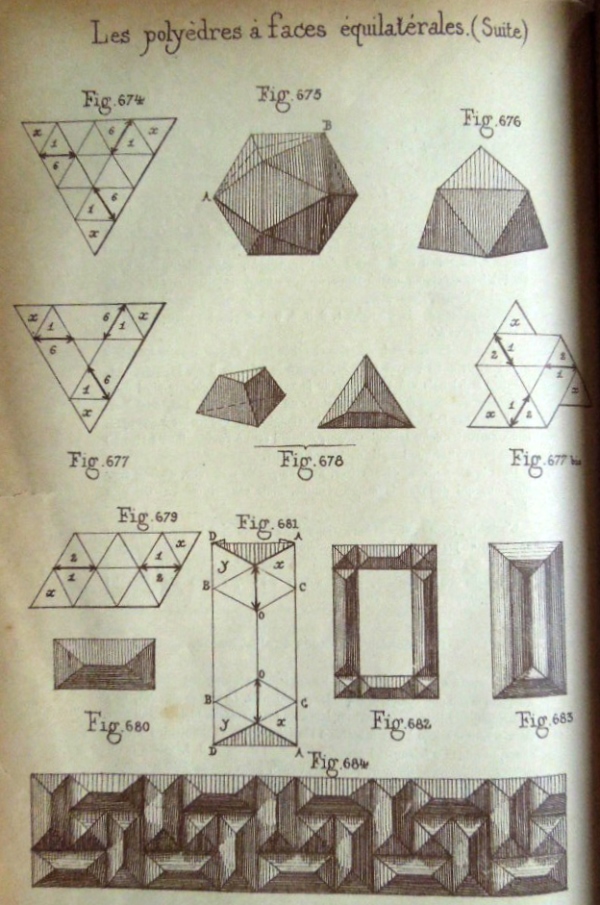
Figs 674 to 676 show ????? Figs 677, 677b and 678 show how to obtain flat-topped tetrahedra from an equilateral triangle using cuts Figs 679 to 680 show how to create a four-sided stretched pyramid from a parallelogram using cuts and 682 and 684 show how to use these pyramids in combination to create designs.. I am not sure what Fig 681 is intended to show. Fig 683 shows an inverted version of the stretched pyramid form. **********
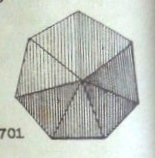
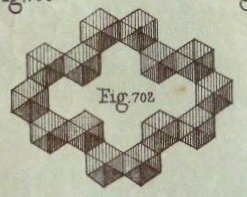
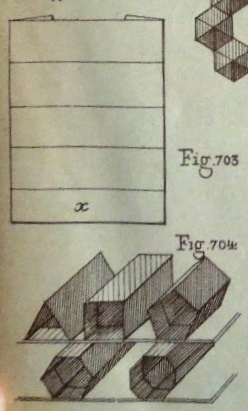
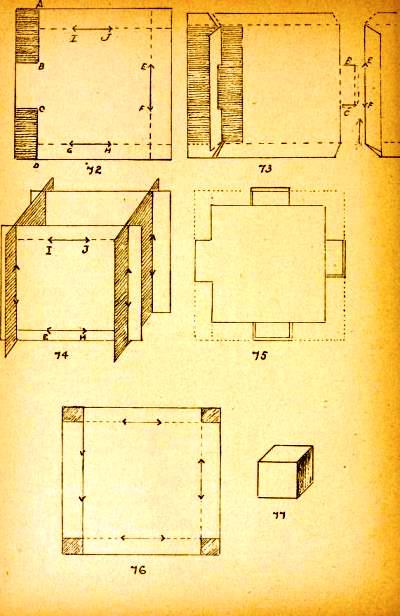
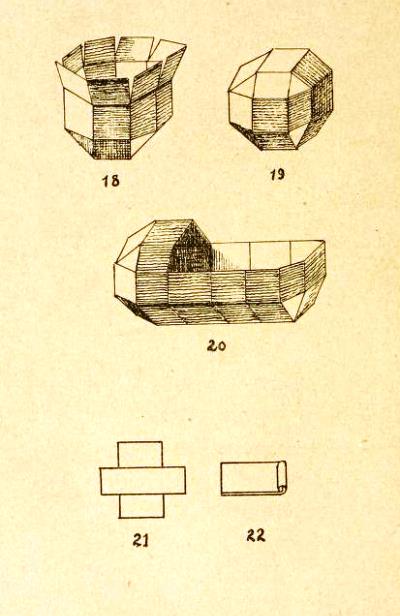
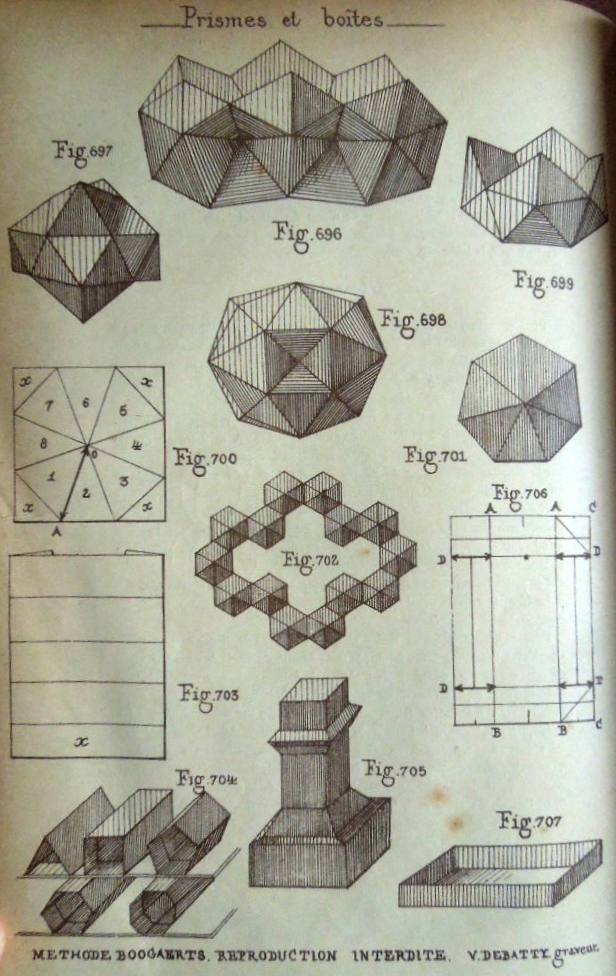
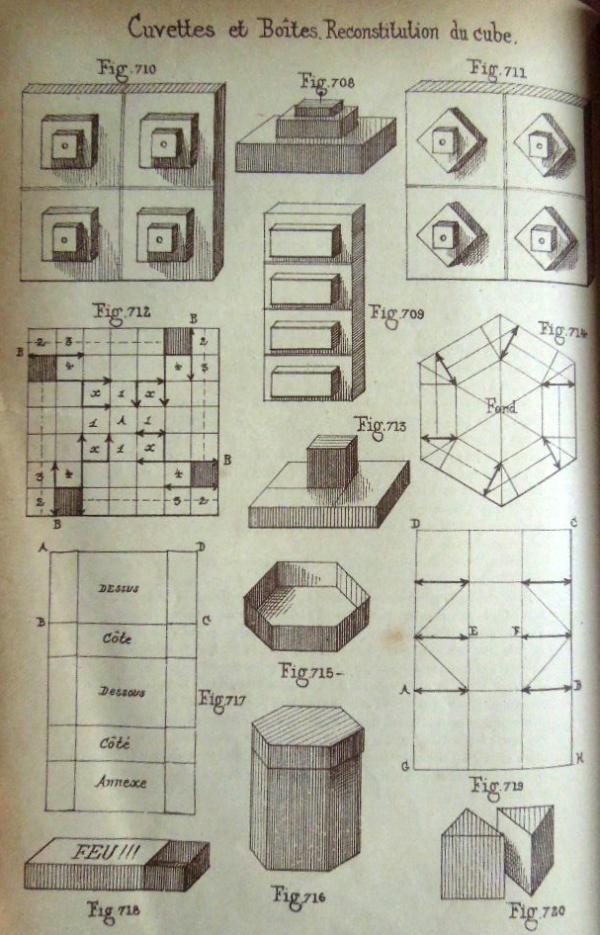
********** (Figs 685 to 695 are missing here) ********** Figs 696 to 699 show various shapes with equilateral triangular faces. It is not clear how these shapes are to be made. Figs 700 to 702 show how to obtain four and five-sided Pyramids from an Octagon using cuts Figs 703 and 704 show how to make Simple Open-Ended Prisms Figs 706 and 707 show how to make a box-tray from a rectangle using cuts Figs 708 to 711 show designs made by combining boxes of various dimensions. Figs 712 and 713 show how to make the simplest of these figures from a single square using cuts Figs 714 to 716 show how to make a lid for a hexagonal box using cuts Figs 717 and 718 show how to make a cover for a matchbox Figs 719 and 720 show how to make a triangular prism from a rectangle using cuts.
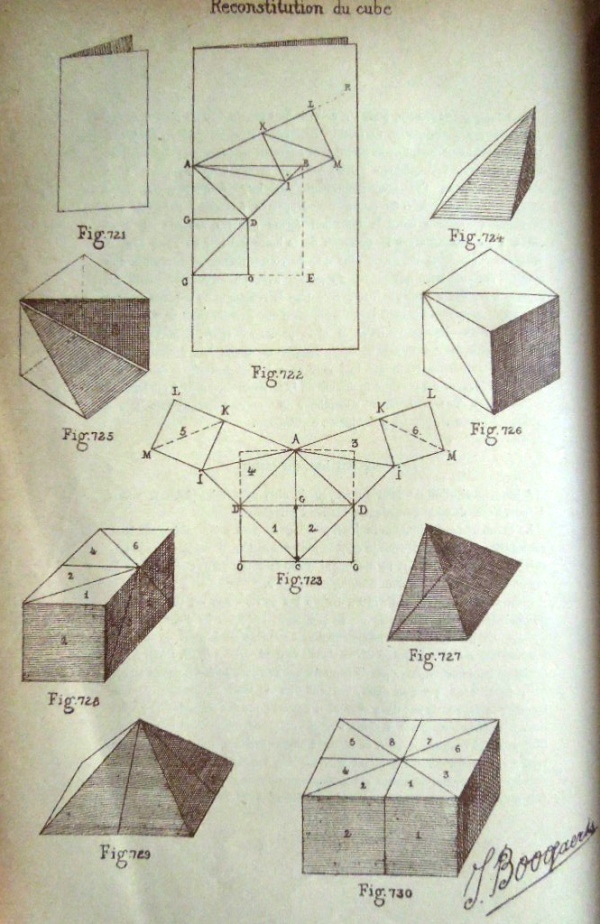
********** Reconstitution of the Cube
********** Les etoiles en relief - Simple Stars
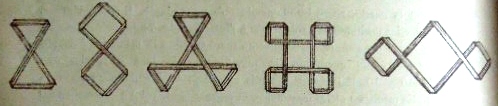
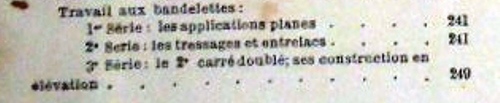
********** Travail aux bandelettes - Designs from Paper Strips
********** Verschnuren
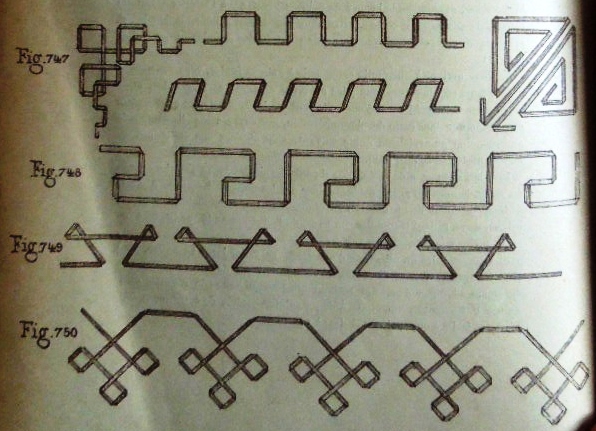
********** Borders and Corners
********** Braiding
********** The Doubled Square This design, made by weaving two strips of paper together, provides a way of linking other strips together. They can be threaded through it in either direction.
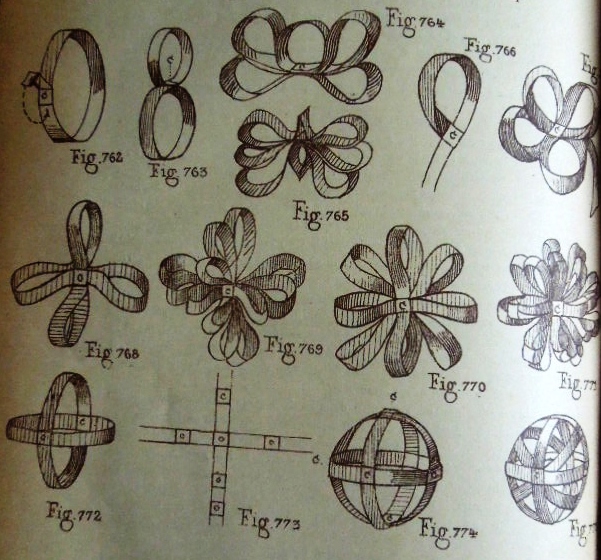
********** Designs made from curled strips threaded through the Doubled Square
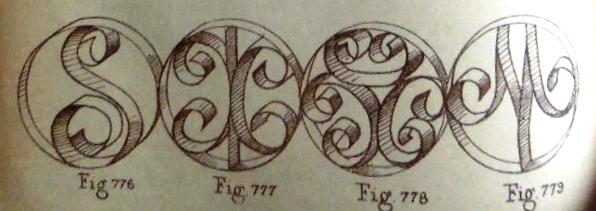
********** Roundels / Quilling patterns
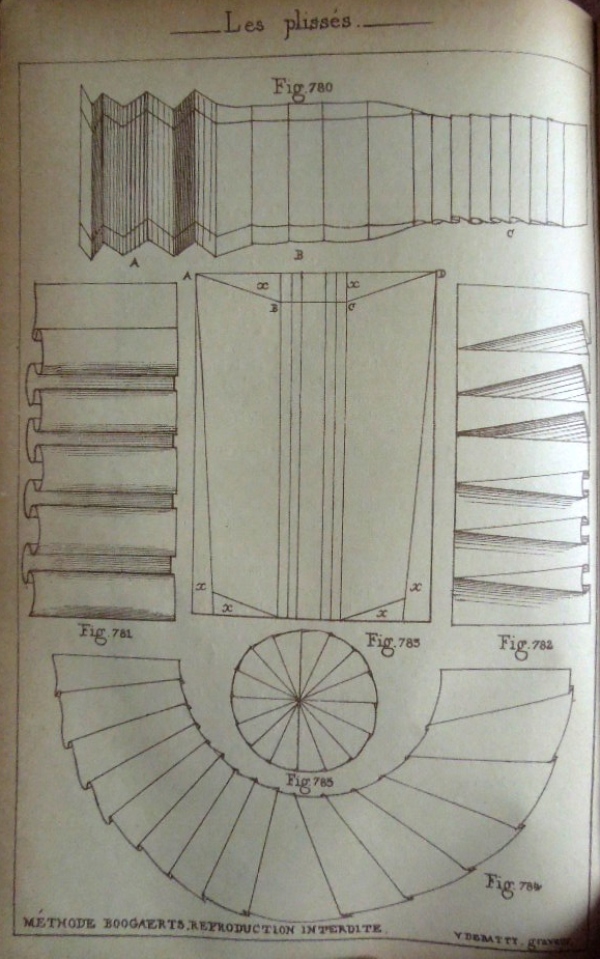
********** Pleated Designs
*********
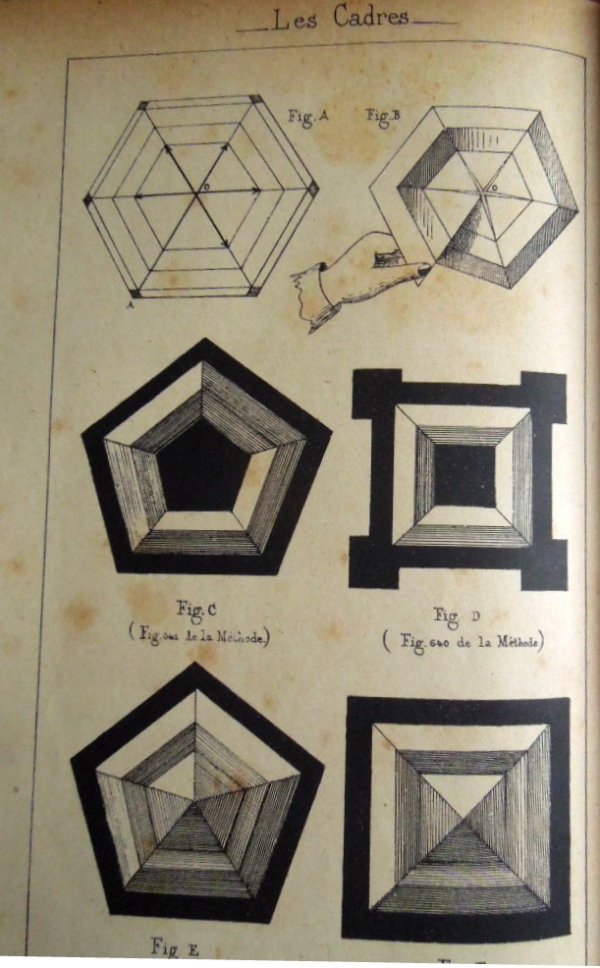
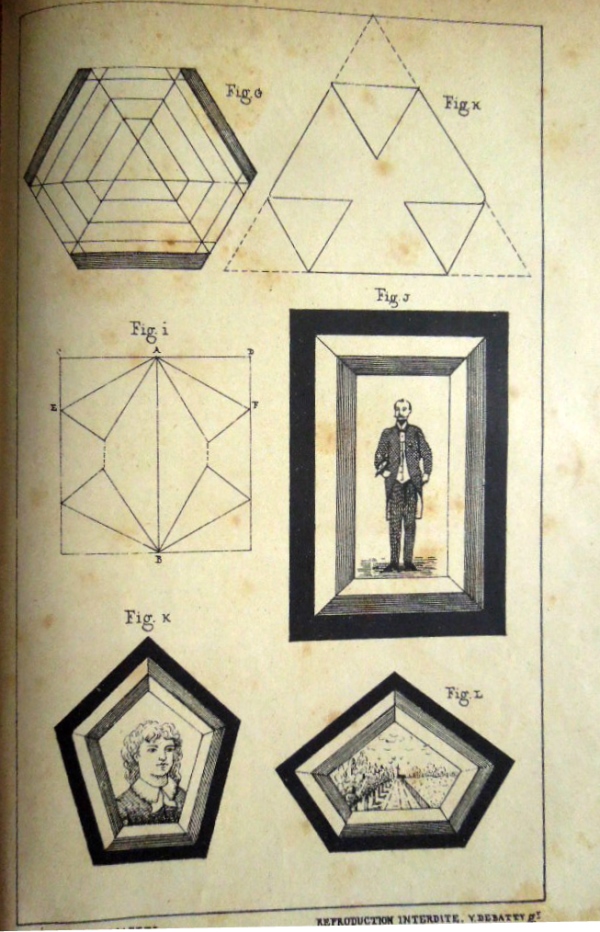
********** Figs A to l and X - Les Cadres These appear to be illustrations of designs mentioned at an earlier stage in the work which have been added as an appendix or after thought.
********** |
|||||||